Tiles Framework란?


Tiles는 웹페이지의 상단메뉴나 좌측메뉴, 공통 파일 include 등의 반복적인 부분을 한 곳에서 깔끔하게 관리할 수 있게 도와주는 템플릿 프레임워크 입니다.


https://tiles.apache.org/

위 URL은 Tiles Framework의 공식 사이트입니다.

Tutorial과 API문서가 상세하게 잘 나와있지만 영어라 그런지 보기가 쉽지 않습니다.

공식 사이트를 보고 따라하기 어려운 분만 아래 내용을 참고해주시면 되겠습니다.


Step 0. 최소 요구사항 확인


※ 현재 최종 버전인 3.08 버전 기준입니다.

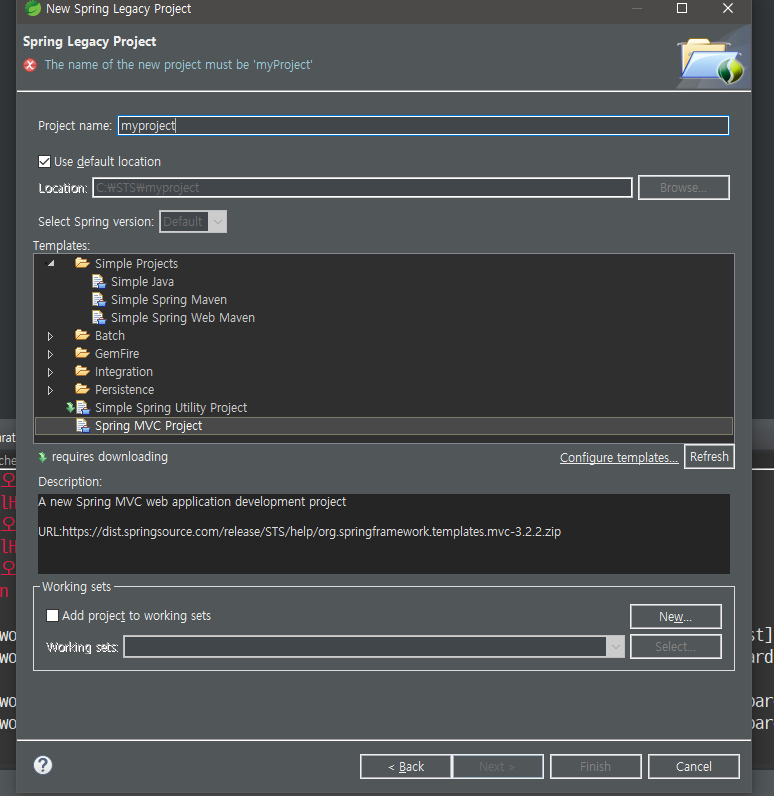
※ Spring STS 플러그인의 Spring MVC Project 예제에 Tiles를 연동하는 방법을 기술 한 것입니다. 프로젝트 구성 별로 설정파일명이 다를 수 있습니다.
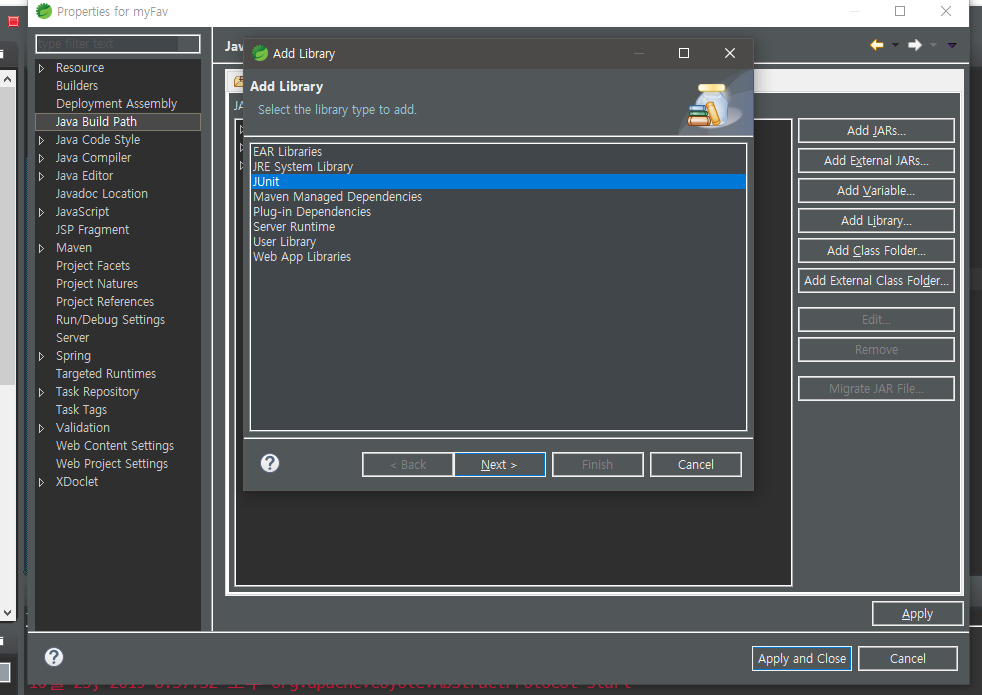
 

- JSTL 필요

* STS를 사용하고 있다면 기본적으로 탑재되어 있고, 그렇지 않다면 JSTL Dependency를 Maven에 추가해줘야 함.

* JSTL이 없으면 아래와 같은 에러 발생

HTTP Status 500 - Handler processing failed; nested exception is java.lang.NoClassDefFoundError: javax/servlet/jsp/jstl/core/Config

- JDK 1.7 이상

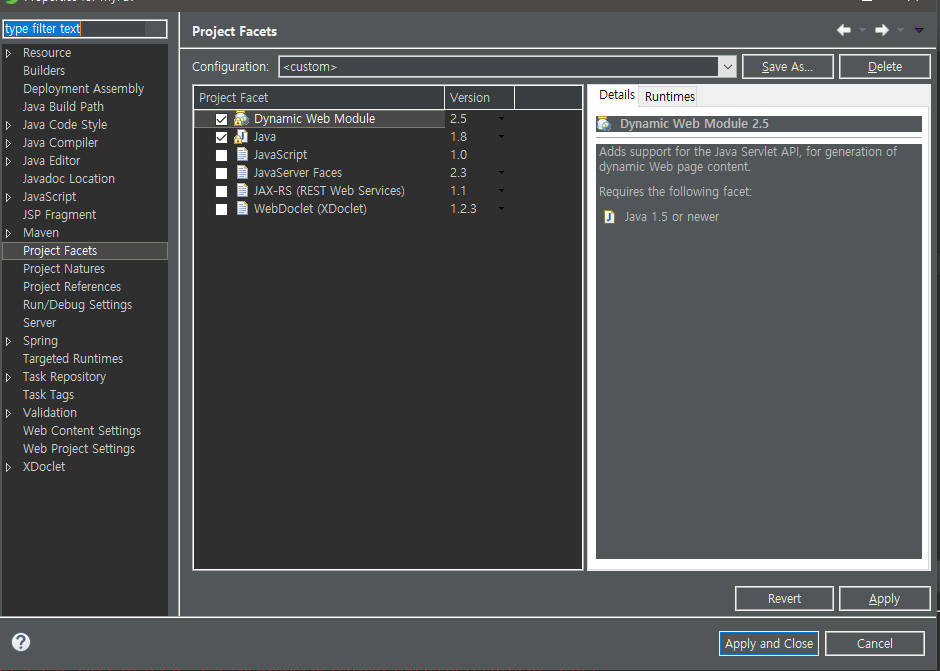
- Servlet 2.5 이상(2.4도 가능은 함)

- JSP 2.1 이상(2.0도 가능은 함)

- Spring 3.2 이상

* 현재 Spring 3.x의 최종 버전인 3.2.18과 4.x의 최종 버전인 4.3.18에서만 테스트 진행 하였습니다.


Step 1. Maven Dependency 추가


        <dependency>
            <groupId>org.apache.tiles</groupId>
            <artifactId>tiles-extras</artifactId>
            <version>3.0.8</version>
          </dependency>
        <dependency>
            <groupId>org.apache.tiles</groupId>
            <artifactId>tiles-servlet</artifactId>
            <version>3.0.8</version>
        </dependency>
        <dependency>
            <groupId>org.apache.tiles</groupId>
            <artifactId>tiles-jsp</artifactId>
            <version>3.0.8</version>
        </dependency>


Step 2. servlet-context.xml 파일에 Tiles 설정 추가


<?xml version="1.0" encoding="UTF-8"?>
<beans:beans xmlns="http://www.springframework.org/schema/mvc"
    xmlns:xsi="http://www.w3.org/2001/XMLSchema-instance"
    xmlns:beans="http://www.springframework.org/schema/beans"
    xmlns:context="http://www.springframework.org/schema/context"
    xsi:schemaLocation="http://www.springframework.org/schema/mvc http://www.springframework.org/schema/mvc/spring-mvc.xsd
        http://www.springframework.org/schema/beans http://www.springframework.org/schema/beans/spring-beans.xsd
        http://www.springframework.org/schema/context http://www.springframework.org/schema/context/spring-context.xsd">
 
    <!-- DispatcherServlet Context: defines this servlet's request-processing infrastructure -->
    
    <!-- Enables the Spring MVC @Controller programming model -->
    <annotation-driven />
 
    <!-- Handles HTTP GET requests for /resources/** by efficiently serving up static resources in the ${webappRoot}/resources directory -->
    <resources mapping="/resources/**" location="/resources/" />
 
    <!-- Resolves views selected for rendering by @Controllers to .jsp resources in the /WEB-INF/views directory -->
    <beans:bean class="org.springframework.web.servlet.view.InternalResourceViewResolver">
        <beans:property name="prefix" value="/WEB-INF/views/" />
        <beans:property name="suffix" value=".jsp" />
        <beans:property name="order" value="2" />
    </beans:bean>    
    
    <context:component-scan base-package="com.my.test" />
    
    <!-- Tiles -->
    <beans:bean id="tilesConfigurer" class="org.springframework.web.servlet.view.tiles3.TilesConfigurer">
        <beans:property name="definitions">
            <beans:list>
                <beans:value>/WEB-INF/tiles/tiles.xml</beans:value>
            </beans:list>
        </beans:property>
    </beans:bean>        
    <beans:bean id="tilesViewResolver" class="org.springframework.web.servlet.view.UrlBasedViewResolver">
        <beans:property name="viewClass" value="org.springframework.web.servlet.view.tiles3.TilesView" />
        <beans:property name="order" value="1" />
    </beans:bean>    
 
</beans:beans>


Step 3. tiles.xml 설정 파일 생성


<!DOCTYPE tiles-definitions PUBLIC
  "-//Apache Software Foundation//DTD Tiles Configuration 3.0//EN"
  "http://tiles.apache.org/dtds/tiles-config_3_0.dtd">
 
<tiles-definitions>
 
    <!-- 메뉴 표시 -->
    <definition name="base" template="/WEB-INF/tiles/template.jsp">
        <put-attribute name="left"   value="/WEB-INF/tiles/left.jsp" />
        <put-attribute name="header" value="/WEB-INF/tiles/header.jsp" />
        <put-attribute name="footer" value="/WEB-INF/tiles/footer.jsp" />
    </definition>
 
    <definition name="*.page" extends="base">
        <put-attribute name="body" value="/WEB-INF/views/{1}.jsp" />
    </definition>
 
     <definition name="*/*.page" extends="base">
         <put-attribute name="body" value="/WEB-INF/views/{1}/{2}.jsp" />
     </definition>
    
    <definition name="*/*/*.page" extends="base">
        <put-attribute name="body" value="/WEB-INF/views/{1}/{2}/{3}.jsp" />
    </definition>


</tiles-definitions>


Step 4. Template 파일 생성


/WEB-INF/tiles/template.jsp

<%@ page language="java" contentType="text/html; charset=UTF-8" pageEncoding="UTF-8"%>
<%@ taglib prefix="tiles" uri="http://tiles.apache.org/tags-tiles" %>
<!DOCTYPE html>
<html lang="ko">
<head>
    <meta charset="UTF-8">
    <title>제목</title>
    <style>
        #header{            
            width:100%;
            height:50px;
            text-align: center;
            background-color: aqua;
        }
        #left{
            float:left;
             width:15%;
            background-color: gray;
        }
        #main{
            float:left;
             width:85%;
            background-color: lime;
        }
        #footer{
            width: 100%;
            height: 50px;            
            text-align: center;
            background-color: orange;
            clear:both;
        }
         #left, #main{ 
               min-height: 600px;
         } 
    </style>
    
    <script src="https://ajax.googleapis.com/ajax/libs/jquery/3.3.1/jquery.min.js"></script>
</head>
<body>
    <div style="width:100%; height:100%;">
    <div id="header"><tiles:insertAttribute name="header" /></div>
    <div id="left"><tiles:insertAttribute name="left" /></div>
    <div id="main"><tiles:insertAttribute name="body" /></div>    
    <div id="footer"><tiles:insertAttribute name="footer" /></div>
    </div>
 
    <script type="text/javascript">
        $(function() {
 
        });    
    </script>    
</body>
</html>


/WEB-INF/tiles/header.jsp

<%@ page language="java" contentType="text/html; charset=UTF-8" pageEncoding="UTF-8"%>
<h1>Header</h1>

/WEB-INF/tiles/left.jsp

<%@ page language="java" contentType="text/html; charset=UTF-8" pageEncoding="UTF-8"%>
<h1>left</h1>

/WEB-INF/tiles/footer.jsp

<%@ page language="java" contentType="text/html; charset=UTF-8" pageEncoding="UTF-8"%>
<h1>Footer</h1>


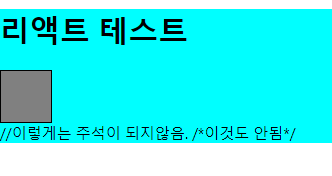
여기까지 하셨으면 Spring에 Tiles를 연동시키는 작업이 모두 끝난 것입니다.

이제 Tiles가 잘 연동되었는지 어떤 식으로 활용하면 되는지 살펴보도록 하겠습니다.


Test를 위해 test.jsp 파일을 아래와 같이 생성하고, 

HomeController.java 파일은 아래와 같이 수정합니다.


/WEB-INF/views/test.jsp

<%@ page language="java" contentType="text/html; charset=UTF-8" pageEncoding="UTF-8"%>
<h1>테스트 Main</h1>


package com.my.test;
 
import java.text.DateFormat;
import java.util.Date;
import java.util.Locale;
 
import org.slf4j.Logger;
import org.slf4j.LoggerFactory;
import org.springframework.stereotype.Controller;
import org.springframework.ui.Model;
import org.springframework.web.bind.annotation.RequestMapping;
import org.springframework.web.bind.annotation.RequestMethod;
 
/**
 * Handles requests for the application home page.
 */
@Controller
public class HomeController {
    
    private static final Logger logger = LoggerFactory.getLogger(HomeController.class);
    
    /**
     * Simply selects the home view to render by returning its name.
     */
    @RequestMapping(value = "/", method = RequestMethod.GET)
    public String home(Locale locale, Model model) {
        logger.info("Welcome home! The client locale is {}.", locale);
        
        Date date = new Date();
        DateFormat dateFormat = DateFormat.getDateTimeInstance(DateFormat.LONG, DateFormat.LONG, locale);
        
        String formattedDate = dateFormat.format(date);
        
        model.addAttribute("serverTime", formattedDate );
        
        return "home";
    }
    

    /**
     * Tiles를 사용(header, left, footer 포함)
     */        
    @RequestMapping("/testPage.do")
    public String testPage() {
        return "test.page";
    }


}


porm.xml


		<!-- 여기서부터 추가 -->
		
		<dependency>
			<groupId>org.springframework</groupId>
			<artifactId>spring-test</artifactId>
			<version>${org.springframework-version}</version>
		</dependency>

		<dependency>
		    <groupId>org.springframework</groupId>
		    <artifactId>spring-jdbc</artifactId>
		    <version>${org.springframework-version}</version>
		</dependency>
		
		<!-- maridb setting -->
		
		<dependency>
		    <groupId>org.mariadb.jdbc</groupId>
		    <artifactId>mariadb-java-client</artifactId>
		    <version>2.3.0</version>
		</dependency>
		

		<!-- https://mvnrepository.com/artifact/org.mybatis/mybatis -->
		<dependency>
		    <groupId>org.mybatis</groupId>
		    <artifactId>mybatis</artifactId>
		    <version>3.4.6</version>
		</dependency>
		
		
		<!-- https://mvnrepository.com/artifact/org.mybatis/mybatis-spring -->
		<dependency>
		    <groupId>org.mybatis</groupId>
		    <artifactId>mybatis-spring</artifactId>
		    <version>1.3.2</version>
		</dependency>
		
		<dependency>
		    <groupId>org.bgee.log4jdbc-log4j2</groupId>
		    <artifactId>log4jdbc-log4j2-jdbc4</artifactId>
		    <version>1.16</version>
		</dependency>
        
        		<!-- Test -->
		<dependency>
			<groupId>junit</groupId>
			<artifactId>junit</artifactId>
			<version>4.12</version>
			<scope>test</scope>
		</dependency>    


java version 수정


	<properties>
		<java-version>1.8</java-version>
		<org.springframework-version>4.3.8.RELEASE</org.springframework-version>
		<org.aspectj-version>1.8.9</org.aspectj-version>
		<org.slf4j-version>1.6.6</org.slf4j-version>
	</properties>


src/main/resources


mappers 생성 -> SQL xml 파일 위치


파일 추가

log4jdbc.log4j2.properties

log4jdbc.spylogdelegator.name=net.sf.log4jdbc.log.slf4j.Slf4jSpyLogDelegator

logback.xml

<?xml version="1.0" encoding="UTF-8"?>
<configuration>
	<include resource="org/springframework/boot/logging/logback/base.xml"></include>
	
	<!-- log4jdbc-log4j2 -->
	<logger name="jdbc.sqlonly" 		level="DEBUG"></logger>
	<logger name="jdbc.sqltiming" 		level="DEBUG"></logger>
	<logger name="jdbc.audit" 			level="DEBUG"></logger>
	<logger name="jdbc.resultset" 		level="DEBUG"></logger>
	<logger name="jdbc.resultsettable" 	level="DEBUG"></logger>
	<logger name="jdbc.connection" 		level="DEBUG"></logger>
</configuration>


mybatis-config.xml

<?xml version="1.0" encoding="UTF-8"?>
<!DOCTYPE configuration
	PUBLIC "-//mybatis.org//DTD Config 3.0//EN"
	"http://mybatis.org/dtd/mybatis-3-config.dtd">

<configuration>
	<typeAliases>
		<package name="com.peta.domain"/>
	</typeAliases>
</configuration>


package 는 맞는 이름으로 설정.


src/main/resources

mappers xml 파일 생성

boardMapper.xml

<?xml version="1.0" encoding="UTF-8"?>
<!DOCTYPE mapper
  PUBLIC "-//mybatis.org//DTD Mapper 3.0//EN"
  "http://mybatis.org/dtd/mybatis-3-mapper.dtd">
  
  
 <mapper namespace="com.peta.mapper.BoardMapper">
  
  	<insert id="create">
  	insert into tb1_board (title,content,writer) value (#{title},#{content},#{writer})
  	</insert>
  
  	<select id="read" resultType="com.peta.domain.BoardVO">
  	select bno,title,content,writer,regdate,viewcnt from tb1_board where bno=#{bno}
  	</select>
  	
  	<update id="update">
  	update tb1_board set title=#{title}, content =#{content} where bno=#{bno}
  	</update>
  
  	<delete id="delete">
  	delete from tb1_board where bno=#{bno}
  	</delete>
  
  	<select id="listAll" resultType="com.peta.domain.BoardVO">
  	<![CDATA[
  	select bno,title,content,writer,regdate,viewcnt from tb1_board where bno > 0 order by bno desc, regdate desc
  	]]>
  	</select>
  	
  	<select id="listPage" resultType="BoardVO">
  	<![CDATA[
  	select bno, title, content, writer, regdate, viewcnt from tb1_board where bno > 0 
  	order by bno desc, regdate desc limit #{page},10
  	]]>
  	</select>
  	
  	<select id="listCriteria" resultType="BoardVO">
  		<![CDATA[
  		select bno, title, content, writer, regdate, viewcnt from tb1_board where bno > 0 
  		order by bno desc, regdate desc limit #{pageStart}, #{perPageNum}
  		]]>
  	</select>
  	
  	<select id="countPaging" resultType="int">
  		<![CDATA[
  		select count(bno) from tb1_board where bno > 0
  		]]>
  	</select>
	<sql id="search">
  		<if test ="searchType !=null">
  			<if test="searchType = 't'.toString()">
  				and title like CONCAT('%',#{keyword},'%')
  			</if>
  			<if test="searchType = 'c'.toString()">
  				and content like CONCAT('%',#{keyword},'%')
  			</if>
  			<if test="searchType = 'w'.toString()">
  				and writer like CONCAT('%',#{keyword},'%')
  			</if>
  			<if test="searchType = 'tc'.toString()">
  				and (title like CONCAT('%',#{keyword},'%') OR content like CONCAT('%',#{keyword},'%'))
  			</if>
  			<if test="searchType = 'cw'.toString()">
  				and (content like CONCAT('%',#{keyword},'%') OR writer like CONCAT('%',#{keyword},'%'))
  			</if>
  			<if test="searchType = 'tcw'.toString()">
  				and (title like CONCAT('%',#{keyword},'%') OR content like CONCAT('%',#{keyword},'%')
  				OR writer like CONCAT('%',#{keyword},'%'))
  			</if>
  		</if>
	</sql>
  		
  	<select id="listSearch" resultType="BoardVO">
  		<![CDATA[
  		select * from tb1_board where bno > 0 
  		]]>
		<include refid="search"></include>
  		<![CDATA[
  		order by bno desc limit #{pageStart}, #{perPageNum}
  		]]>
  		
  	</select>
  	
  	<select id="listSearchCount" resultType="int">
  	<![CDATA[
  	select count(bno) from tb1_board where bno > 0
  	]]>
  	<include refid="search"></include>
  	</select>
 </mapper>


src/main/webapp/WEB-INF/spring/appServlet/servlet-content.xml


컨트롤러 연결


<?xml version="1.0" encoding="UTF-8"?>
<beans:beans xmlns="http://www.springframework.org/schema/mvc"
	xmlns:xsi="http://www.w3.org/2001/XMLSchema-instance"
	xmlns:beans="http://www.springframework.org/schema/beans"
	xmlns:context="http://www.springframework.org/schema/context"
	xsi:schemaLocation="http://www.springframework.org/schema/mvc https://www.springframework.org/schema/mvc/spring-mvc.xsd
		http://www.springframework.org/schema/beans https://www.springframework.org/schema/beans/spring-beans.xsd
		http://www.springframework.org/schema/context https://www.springframework.org/schema/context/spring-context.xsd">

	<!-- DispatcherServlet Context: defines this servlet's request-processing infrastructure -->
	
	<!-- Enables the Spring MVC @Controller programming model -->
	<annotation-driven />

	<!-- Handles HTTP GET requests for /resources/** by efficiently serving up static resources in the ${webappRoot}/resources directory -->
	<resources mapping="/resources/**" location="/resources/" />

	<!-- Resolves views selected for rendering by @Controllers to .jsp resources in the /WEB-INF/views directory -->
	<beans:bean class="org.springframework.web.servlet.view.InternalResourceViewResolver">
		<beans:property name="prefix" value="/WEB-INF/views/" />
		<beans:property name="suffix" value=".jsp" />
	</beans:bean>
	
	<context:component-scan base-package="com.peta.controller" />


</beans:beans>


src/main/webapp/WEB-INF/views/web.xml


	<filter>
		<filter-name>encoding</filter-name>
		<filter-class>org.springframework.web.filter.CharacterEncodingFilter</filter-class>
			<init-param>
				<param-name>encoding</param-name>
				<param-value>UTF-8</param-value>
			</init-param>
	</filter>
	<filter-mapping>
		<filter-name>encoding</filter-name>
		<url-pattern>/*</url-pattern>
	</filter-mapping>

encoding 추가


src/main/webapp/WEB-INF/spring/root-context.xml


<?xml version="1.0" encoding="UTF-8"?>
<beans xmlns="http://www.springframework.org/schema/beans"
	xmlns:xsi="http://www.w3.org/2001/XMLSchema-instance"
	xmlns:context="http://www.springframework.org/schema/context"
	xmlns:mybatis-spring="http://mybatis.org/schema/mybatis-spring"
	xsi:schemaLocation="http://mybatis.org/schema/mybatis-spring http://mybatis.org/schema/mybatis-spring-1.2.xsd
		http://www.springframework.org/schema/beans https://www.springframework.org/schema/beans/spring-beans.xsd
		http://www.springframework.org/schema/context http://www.springframework.org/schema/context/spring-context-4.3.xsd">
	
	<!-- Root Context: defines shared resources visible to all other web components -->
		
   <bean id="dataSource" class="org.springframework.jdbc.datasource.DriverManagerDataSource">
   		<!-- <property name="driverClassName" value="net.sf.log4jdbc.sql.jdbcapi.DriverSpy"></property> -->
        <property name="driverClassName" value="org.mariadb.jdbc.Driver"></property>
        <property name="url" value="jdbc:mariadb://127.0.0.1:3306/book_ex?useSSL=false"></property>
        <property name="username" value="id"></property>
        <property name="password" value="password"></property>
    </bean>
    
   	<bean id="SqlSessionFactory" class="org.mybatis.spring.SqlSessionFactoryBean">
		<property name="dataSource" ref="dataSource" />
		<property name="configLocation" value="classpath:/mybatis-config.xml"/>
		<property name="mapperLocations" value="classpath:/mappers/*Mapper.xml" />
	</bean>
	
	
	<bean id="sqlSession" class="org.mybatis.spring.SqlSessionTemplate"

		destroy-method="clearCache">

		<constructor-arg name="sqlSessionFactory" ref="SqlSessionFactory" />

	</bean> 
	<context:component-scan base-package="com.peta.persistence"></context:component-scan>
	<context:component-scan base-package="com.peta.service"></context:component-scan>
</beans>


JAVA 버전 변경


JUNIT 테스트시 추가.


test 

Mapper.xml 파일 모두 주석처리후.


src/test/java/DataTest.java

package com.peta.home;

import java.sql.Connection;

import javax.inject.Inject;
import javax.sql.DataSource;

import org.junit.Test;
import org.junit.runner.RunWith;
import org.springframework.test.context.ContextConfiguration;
import org.springframework.test.context.junit4.SpringJUnit4ClassRunner;

@RunWith(SpringJUnit4ClassRunner.class)
@ContextConfiguration(locations= {"file:src/main/webapp/WEB-INF/spring/**/root-context.xml"})
public class DataTest {
	@Inject
	private DataSource ds;
	
	@Test
	public void testConection()throws Exception{
		try(Connection con = ds.getConnection()){
			System.out.println("디비연결성공");
			System.out.println(con);
		}catch(Exception e) {
			System.out.println("디비연결실패");
			e.printStackTrace();
		}
		
	}
	
}

디비 연결 완료


jsp 양식 추가

<!DOCTYPE html>

<%@ page language="java" contentType="text/html; charset=UTF-8" pageEncoding="UTF-8"%>
    
<%@ taglib prefix="c" uri="http://java.sun.com/jsp/jstl/core" %>
<%@ taglib prefix="spring" uri="http://www.springframework.org/tags"%>

<html>
	<head>
		<meta charset="utf-8">
		<title>Welcome</title>
	</head> 
	<body>

	</body>
</html>

애노테이션 설명 사용
@Controller 스프링 MVC의 컨트롤러 객체임을 명시하는 애노테이션 클래스
@RequestMapping 특정 URI에 매칭되는 클래스나 메소드임을 명시하는 애노테이션 클래스,매소드
@RequestParam 요청(request)에서 특정한 파라미터의 값을 찾아낼때 사용 파라미터
@RequestHeader 요청(request)에서 특정 HTTP 헤더 정보를 추출할떄 사용 파라미터
@PathVariable 현재의 URI에서 원하는 정보를 추출할때 사용 파라미터
@CookieValue 현재 사용자의 쿠키가 존재하는 경우 쿠키의 이름을 이용해서 쿠키의 값을 추출 파라미터
@ModelAttribute 자동으로 해당 객체를 뷰까지 전달하도록 만드는 애노테이션 메소드,파라미터
@SessionAttribute 세션상에서 모델의 정보를 유지하고 싶은 경우에 사용 클래스
@InitBinder 파라미터를 수집해서 객체로 만들 경우에 커스터마이징 메소드
@RespnseBody 리턴 타임이 HTTP의 응답 메세지로 전송 메소드,리턴타입
@RequestBody 요청(request) 문자열이 그대로 파라미터로 전달 파라미터
@Repository DAO 객체 클래스
@Service 서비스 객체 클래스
 

Sass 사용시 node-sass 추가

$ yarn add node-sass


적용방법


src/MyComponent.js

import React from 'react';
import './MyComponent.scss';

const MyComponent = () => {
  return (
    <div className="MyComponent">
      <div className="something-inside">Hello CRA v2</div>
    </div>
  );
};

export default MyComponent;


src/MyComponent.scss

.MyComponent {
  background: black;
  color: white;
  padding: 1rem;
  .something-inside {
    background: white;
    color: black;
    font-size: 2rem;
    text-align: center;
    padding: 1rem;
  }
}


src/App.js

import React, { Component } from "react";
import MyComponent from "./MyComponent";

class App extends Component {
  render() {
    return (
      <div>
        <MyComponent />
      </div>
    );
  }
}

export default App;


CSS Module


CSS Module 은 사용 방식이 이전과 조금 다릅니다. 파일을 생성하실 때 파일이름.module.css 이런식으로 하시면 CSS Module 이 적용됩니다.


src/AnotherComponent.module.css

.wrapper {
  background: gray;
  color: white;
  padding: 1rem;
  font-size: 2rem;
}


src/AnotherComponent.js

import React from 'react';
import styles from './AnotherComponent.module.css';

const AnotherComponent = () => {
  return <div className={styles.wrapper}>What about CSS Module?</div>;
};

export default AnotherComponent;


src/App.js

import React, { Component } from 'react';
import MyComponent from './MyComponent';
import AnotherComponent from './AnotherComponent';

class App extends Component {
  render() {
    return (
      <div>
        <MyComponent />
        <AnotherComponent />
      </div>
    );
  }
}

export default App;


출처 : https://velog.io/@velopert/create-react-app-v2

'프로그래밍언어 > React' 카테고리의 다른 글

React Event 이벤트 종류  (0) 2019.07.20
React Component 불러오기 (props)  (0) 2019.07.20
React 주석  (0) 2019.07.20
React css사용방법  (0) 2019.07.20
React if문  (0) 2019.07.20


[root@peta ~]# netstat -ntlp | grep :80


1


SyntheticEvent

This reference guide documents the SyntheticEvent wrapper that forms part of React’s Event System. See the Handling Events guide to learn more.

Overview

Your event handlers will be passed instances of SyntheticEvent, a cross-browser wrapper around the browser’s native event. It has the same interface as the browser’s native event, including stopPropagation() and preventDefault(), except the events work identically across all browsers.

If you find that you need the underlying browser event for some reason, simply use the nativeEvent attribute to get it. Every SyntheticEvent object has the following attributes:

boolean bubbles boolean cancelable DOMEventTarget currentTarget boolean defaultPrevented number eventPhase boolean isTrusted DOMEvent nativeEvent void preventDefault() boolean isDefaultPrevented() void stopPropagation() boolean isPropagationStopped() DOMEventTarget target number timeStamp string type

Note:

As of v0.14, returning false from an event handler will no longer stop event propagation. Instead, e.stopPropagation() or e.preventDefault() should be triggered manually, as appropriate.

Event Pooling

The SyntheticEvent is pooled. This means that the SyntheticEvent object will be reused and all properties will be nullified after the event callback has been invoked. This is for performance reasons. As such, you cannot access the event in an asynchronous way.

function onClick(event) { console.log(event); // => nullified object. console.log(event.type); // => "click" const eventType = event.type; // => "click" setTimeout(function() { console.log(event.type); // => null console.log(eventType); // => "click" }, 0); // Won't work. this.state.clickEvent will only contain null values. this.setState({clickEvent: event}); // You can still export event properties. this.setState({eventType: event.type}); }

Note:

If you want to access the event properties in an asynchronous way, you should call event.persist() on the event, which will remove the synthetic event from the pool and allow references to the event to be retained by user code.

Supported Events

React normalizes events so that they have consistent properties across different browsers.

The event handlers below are triggered by an event in the bubbling phase. To register an event handler for the capture phase, append Capture to the event name; for example, instead of using onClick, you would use onClickCapture to handle the click event in the capture phase.


Reference

Clipboard Events

Event names:

onCopy onCut onPaste

Properties:

DOMDataTransfer clipboardData


Composition Events

Event names:

onCompositionEnd onCompositionStart onCompositionUpdate

Properties:

string data


Keyboard Events

Event names:

onKeyDown onKeyPress onKeyUp

Properties:

boolean altKey number charCode boolean ctrlKey boolean getModifierState(key) string key number keyCode string locale number location boolean metaKey boolean repeat boolean shiftKey number which

The key property can take any of the values documented in the DOM Level 3 Events spec.


Focus Events

Event names:

onFocus onBlur

These focus events work on all elements in the React DOM, not just form elements.

Properties:

DOMEventTarget relatedTarget


Form Events

Event names:

onChange onInput onInvalid onSubmit

For more information about the onChange event, see Forms.


Mouse Events

Event names:

onClick onContextMenu onDoubleClick onDrag onDragEnd onDragEnter onDragExit onDragLeave onDragOver onDragStart onDrop onMouseDown onMouseEnter onMouseLeave onMouseMove onMouseOut onMouseOver onMouseUp

The onMouseEnter and onMouseLeave events propagate from the element being left to the one being entered instead of ordinary bubbling and do not have a capture phase.

Properties:

boolean altKey number button number buttons number clientX number clientY boolean ctrlKey boolean getModifierState(key) boolean metaKey number pageX number pageY DOMEventTarget relatedTarget number screenX number screenY boolean shiftKey


Pointer Events

Event names:

onPointerDown onPointerMove onPointerUp onPointerCancel onGotPointerCapture onLostPointerCapture onPointerEnter onPointerLeave onPointerOver onPointerOut

The onPointerEnter and onPointerLeave events propagate from the element being left to the one being entered instead of ordinary bubbling and do not have a capture phase.

Properties:

As defined in the W3 spec, pointer events extend Mouse Events with the following properties:

number pointerId number width number height number pressure number tangentialPressure number tiltX number tiltY number twist string pointerType boolean isPrimary

A note on cross-browser support:

Pointer events are not yet supported in every browser (at the time of writing this article, supported browsers include: Chrome, Firefox, Edge, and Internet Explorer). React deliberately does not polyfill support for other browsers because a standard-conform polyfill would significantly increase the bundle size of react-dom.

If your application requires pointer events, we recommend adding a third party pointer event polyfill.


Selection Events

Event names:

onSelect


Touch Events

Event names:

onTouchCancel onTouchEnd onTouchMove onTouchStart

Properties:

boolean altKey DOMTouchList changedTouches boolean ctrlKey boolean getModifierState(key) boolean metaKey boolean shiftKey DOMTouchList targetTouches DOMTouchList touches


UI Events

Event names:

onScroll

Properties:

number detail DOMAbstractView view


Wheel Events

Event names:

onWheel

Properties:

number deltaMode number deltaX number deltaY number deltaZ


Media Events

Event names:

onAbort onCanPlay onCanPlayThrough onDurationChange onEmptied onEncrypted onEnded onError onLoadedData onLoadedMetadata onLoadStart onPause onPlay onPlaying onProgress onRateChange onSeeked onSeeking onStalled onSuspend onTimeUpdate onVolumeChange onWaiting


Image Events

Event names:

onLoad onError


Animation Events

Event names:

onAnimationStart onAnimationEnd onAnimationIteration

Properties:

string animationName string pseudoElement float elapsedTime


Transition Events

Event names:

onTransitionEnd

Properties:

string propertyName string pseudoElement float elapsedTime


Other Events

Event names:

onToggle

Edit this page


reactjs/reactjs.org

The React documentation website. Contribute to reactjs/reactjs.org development by creating an account on GitHub.

github.com

https://reactjs.org/docs/events.html

'프로그래밍언어 > React' 카테고리의 다른 글

React Create-react-app V2 css , scss 변경사항 적용  (0) 2019.07.23
React Component 불러오기 (props)  (0) 2019.07.20
React 주석  (0) 2019.07.20
React css사용방법  (0) 2019.07.20
React if문  (0) 2019.07.20

MyComponent.js


import React, { Component } from 'react';

class MyComponent extends Component {
    render() {
        return (
            <div>
                나의 새롭고 멋진 컴포넌트
            </div>
        );
    }
}

export default MyComponent;


App.js


import MyComponent from './MyComponent';

1


import React , {Component} from 'react';
import './App.css'
import MyComponent from './MyComponent'; //MyCompopnent 파일 불러옵니다.

class App extends Component{
  render(){


    return(
<MyComponent/>
    )
  }
}

export default App;


import 를 이용하여 컴포넌트를 불러온다.


작동후 모습


Props


MyComponent.js (자식 컴포넌트)

            <div>
                안녕하세요 , 제이름은 {this.props.name} 입니다.
            </div>


App.js (부모 컴포넌트)

    return(
<MyComponent name="Petabyte"/>
    )

화면


defaultProps


class MyComponent extends Component {

    static defaultProps={
        name:'기본이름'
    }
    render() {
        return (
            <div>
                안녕하세요 , 제이름은 {this.props.name} 입니다.
            </div>
        );
    }
}

화면


PropTypes 종류

array : 배열

bool : 참, 거짓

func:함수

number:숫자

object:객체

string:문자열

symbol:ES6 문법의 심벌 개체

node :렌더링 할수 있는 모든것(숫자,문자열,element 또는 이들로 구성된 배열)

element:리액트 요소

instanseOf(myclass): 특정 클래스의 인스턴스

oneOf(['Male','Female']):주어진 배열 요소중 하나

oneOfType([React.PropTypes.string, React.PropTypes.number]):주어진 배열 안의 종류중 하나

arrayOf(React.PropTypes.number):주어진 종류로 구성된 배열

objectOf(React.PropTypes.number):주어진 종류의 값을 가진 객체

shape({name:React.PropTypes.striong, age:React.PropTypes.number}):주어진 스키마를 가진 객체

any:아무 종류


사용방법 : PropTypes.bool  또는 PropTypes.any.isRequired 같은 방식으로 사용


    constructor(props){
        super(props);
        this.state={
          number:0
        }

constructor 설정시 부모 컴포넌트에서 수정할수 없음.

'프로그래밍언어 > React' 카테고리의 다른 글

React Create-react-app V2 css , scss 변경사항 적용  (0) 2019.07.23
React Event 이벤트 종류  (0) 2019.07.20
React 주석  (0) 2019.07.20
React css사용방법  (0) 2019.07.20
React if문  (0) 2019.07.20
import React , {Component} from 'react';
import './App.css'

class App extends Component{
  render(){

    const style = {
      backgroundColor : 'gray',
      border:'1px solid black',
      height:Math.random(Math.random() * 500 ) + 50,
      width:Math.random(Math.random() * 500) + 50,
      WebkitTransition:'all',
      MozTransition:'all',
      msTransition:'all'
    };


    return(
      <div className="my-div"> 
      {/*요소 밖에서는 이렇게 주석 */}
        <h1>리액트 테스트</h1>
        <div style={style}
        // self-cloed 태그에서만 작동하는 주석
        />
        //이렇게는 주석이 되지않음.
        /*이것도 안됨*/
      </div>
    )
  }
}

export default App;

/> 안에 들어가야하며 새줄에 // 방식으로 주석을 사용할수있고. 그렇지 않을경우는

{/* 이런식으로 사용한다 */ }

화면에 보이는 모습

'프로그래밍언어 > React' 카테고리의 다른 글

React Event 이벤트 종류  (0) 2019.07.20
React Component 불러오기 (props)  (0) 2019.07.20
React css사용방법  (0) 2019.07.20
React if문  (0) 2019.07.20
React App.js  (0) 2019.07.20
import React , {Component} from 'react';


class App extends Component{
  render(){

    const style = {
      backgroundColor : 'gray',
      border:'1px solid black',
      height:Math.random(Math.random() * 500 ) + 50,
      width:Math.random(Math.random() * 500) + 50,
      WebkitTransition:'all',
      MozTransition:'all',
      msTransition:'all'
    };


    return(
      <div>
        <h1>리액트 테스트</h1>
        <div style={style}></div>
      </div>
    )
  }
}

export default App;

보이는 화면


Import 방식

App.css

.my-div{
  background-color: aqua;
  font-size: 15px;
}


App.js

import React , {Component} from 'react';
import './App.css'

class App extends Component{
  render(){

    const style = {
      backgroundColor : 'gray',
      border:'1px solid black',
      height:Math.random(Math.random() * 500 ) + 50,
      width:Math.random(Math.random() * 500) + 50,
      WebkitTransition:'all',
      MozTransition:'all',
      msTransition:'all'
    };


    return(
      <div className="my-div"> 
        <h1>리액트 테스트</h1>
        <div style={style}></div>
      </div>
    )
  }
}

export default App;

className 으로 div 를 설정한이후 App.css 를 import 한이후 사용한다.


설정시 보이는 화면

'프로그래밍언어 > React' 카테고리의 다른 글

React Component 불러오기 (props)  (0) 2019.07.20
React 주석  (0) 2019.07.20
React if문  (0) 2019.07.20
React App.js  (0) 2019.07.20
Create-react-app V2 변경 적용사항.  (0) 2019.07.13

ES6 의 const 와 let


var 방식

function myFunction(){
	var a = "hello";
    if(true){
    	var a = "bye";
        console.log(a);  // bye
       }
   console.log(a); //bye
 }


let 방식

function myFunction(){
	let a = 1;
    if(true){
    	let a = 2;
        console.log(a); // 2
    }
    console.log(a); //1
 }


const 는 재설정 불가.


If 문 대신 조건부 연산자.


import React , {Component} from 'react';


class App extends Component{
  render(){
    const text ='자바스크립트 테스트입니다.'
    const condition = true;


    return(
      <div>
        <h1>리액트 테스트</h1>
        <h2>{text}</h2> 
        {
          condition ? '참':'거짓'
        }
        <h5>참일때만 출력</h5>
        {
          condition ? '보여주세요':null
        }
        <h5>&& 연산자</h5>
        {
          condition  && '보여주세요'
        }
      </div>
    )
  }
}

export default App;


보이는 화면


'프로그래밍언어 > React' 카테고리의 다른 글

React 주석  (0) 2019.07.20
React css사용방법  (0) 2019.07.20
React App.js  (0) 2019.07.20
Create-react-app V2 변경 적용사항.  (0) 2019.07.13
React 초기 셋팅  (0) 2019.06.27
import React from 'react';
import logo from './logo.svg';
import './App.css';

function App() {
  return (
    <div className="App">
      <header className="App-header">
        <img src={logo} className="App-logo" alt="logo" />
        <p>
          Edit <code>src/App.js</code> and save to reload.
        </p>
        <a
          className="App-link"
          href="https://reactjs.org"
          target="_blank"
          rel="noopener noreferrer"
        >
          Learn React
        </a>
      </header>
    </div>
  );
}

export default App;

import React from 'react';  (ES6 방식)


npm 을 통해 설치하게되면 node_modules 에 설치가된다. 

그것을 불러와 사용하기 위하여 import 할때 사용한다.


자바스크립트로 해석하면 

var React = require('react');


ES6 class 문법

class Dog{
	constructor(name) {
    	this.name = name;
       }
    say(){
    	console.log(this.name + ': 멍멍');
       }
  }
  
  const dong = new Dog('휜둥이');
  dog.say();
  
  //휜둥이 : 멍멍


샘플로 설치된 리액트를 실행한 화면


'프로그래밍언어 > React' 카테고리의 다른 글

React 주석  (0) 2019.07.20
React css사용방법  (0) 2019.07.20
React if문  (0) 2019.07.20
Create-react-app V2 변경 적용사항.  (0) 2019.07.13
React 초기 셋팅  (0) 2019.06.27


index.js [serviceWorker]

import * as serviceWorker from './serviceWorker';

serviceWorker.register ();


webpack.config.js

            {
              test: sassRegex,
              exclude: sassModuleRegex,
              use: getStyleLoaders(
                {
                  importLoaders: 2,
                  sourceMap: isEnvProduction && shouldUseSourceMap,
                },
                'sass-loader'
              ),
              sideEffects: true,
            },

해당부분 아래와 같이 변경.

            {
              test: sassRegex,
              exclude: sassModuleRegex,
              use: getStyleLoaders({
                importLoaders: 2,
                sourceMap: isEnvProduction && shouldUseSourceMap
              }).concat({
                loader: require.resolve('sass-loader'),
                options: {
                  includePaths: [paths.appSrc + '/styles'],
                  sourceMap: isEnvProduction && shouldUseSourceMap
                }
              }),
              // Don't consider CSS imports dead code even if the
              // containing package claims to have no side effects.
              // Remove this when webpack adds a warning or an error for this.
              // See https://github.com/webpack/webpack/issues/6571
              sideEffects: true
            },


'프로그래밍언어 > React' 카테고리의 다른 글

React 주석  (0) 2019.07.20
React css사용방법  (0) 2019.07.20
React if문  (0) 2019.07.20
React App.js  (0) 2019.07.20
React 초기 셋팅  (0) 2019.06.27

node 설치 https://nodejs.org/ko/


Node.js

Node.js® is a JavaScript runtime built on Chrome's V8 JavaScript engine.

nodejs.org

yarn 다운로드 https://yarnpkg.com/en/docs/install#windows-stable


Yarn

Fast, reliable, and secure dependency management.

yarnpkg.com

yarn 설치 https://chocolatey.org/install


Installation

That's it! All you need is choco.exe (that you get from the installation scripts) and you are good to go! No Visual Studio required. Chocolatey installs in seconds. You are just a few steps from running choco right now! With PowerShell, there is an additio

chocolatey.org


Vscode 설치 https://code.visualstudio.com/


Visual Studio Code - Code Editing. Redefined

Visual Studio Code is a code editor redefined and optimized for building and debugging modern web and cloud applications.  Visual Studio Code is free and available on your favorite platform - Linux, macOS, and Windows.

code.visualstudio.com

VS Code 확장프로그램

ESLint (자바스크립트 문법체크)

Realative Path (상대경로 파일 경로 지정)

Guides (들여쓰기 가이드라인)

Reactjs code snippets (리액트관련 스니펫 모음) 제작사 : Charalampos Karypidis 


create-react-app 으로 TEST 


case1 yarn 설치
yarn global add create-react-app

case2 npm 설치  
npm install -g create-react-app


react 테스트

$ create-react-app hello-react
$ cd hello-react
$ yarn start


다음과 같은 화면이 나오면 초기 셋팅 완료.

'프로그래밍언어 > React' 카테고리의 다른 글

React 주석  (0) 2019.07.20
React css사용방법  (0) 2019.07.20
React if문  (0) 2019.07.20
React App.js  (0) 2019.07.20
Create-react-app V2 변경 적용사항.  (0) 2019.07.13


#새로운 저장소 초기화 bash 상에서 루트로 진입한이후

git init


#초기 설정 

git config --global user.name 계정명

git config --global user.email email계정


#깃 클론

git clone https://깃주소명


#깃 파일추가

git add 파일명

git add .  : 전체파일을 추가


#깃 commit 

git commit -m "커밋시 메모"


#push 업로드

git push


#git 상태확인

git status

기본 parser 구조 


http://www.pythonscraping.com/pages/page1.html 주소에서 Div 내역만 얻고자 할때.(기본)


from urllib.request import urlopen
from bs4 import BeautifulSoup

html = urlopen("http://www.pythonscraping.com/pages/page1.html")
bsObj = BeautifulSoup(html.read(), "html.parser")
print(bsObj.div)

print 결과

<div>

Lorem ipsum dolor sit amet, consectetur adipisicing elit, sed do eiusmod tempor incididunt ut labore et dolore magna aliqua. Ut enim ad minim veniam, quis nostrud exercitation ullamco laboris nisi ut aliquip ex ea commodo consequat. Duis aute irure dolor in reprehenderit in voluptate velit esse cillum dolore eu fugiat nulla pariatur. Excepteur sint occaecat cupidatat non proident, sunt in culpa qui officia deserunt mollit anim id est laborum.</

</div>

1


except 를 활용하여 에러 표시 추가

from urllib.request import urlopen
from urllib.request import HTTPError
from bs4 import BeautifulSoup

try:
html = urlopen("http://www.pythonscraping.com/pages/page1.html")
except HTTPError as e:
#문재가 발생하였을경우 에러 표시
print(e)
else:
#프로그램을 계속 실행합니다.
bsObj = BeautifulSoup(html.read(), "html.parser")
print(bsObj.div)

'빅데이터 > Scrapy' 카테고리의 다른 글

BeautifulShop 크롤링  (0) 2020.01.05
Xpath 사용법  (0) 2018.08.25


var Users=[{name:'소녀시대',age:20},{name:'걸스데이',age:22},{name:'티아라',age:23},{name:'애프터스쿨',age:25}];


console.log('배열 요소의 수 : %d',Users.length);

console.log('원본 Users');

console.dir(Users);


var Users2 = Users.slice(1,3);


console.log('slice() 로 잘라낸 후 Users2');

console.dir(Users2);


var Users3 = Users2.slice(1);


console.log('slice() 로 잘라낸후 Users3');

console.dir(Users3);


출력 결과:


배열 요소의 수 : 4
원본 Users
[ { name: '소녀시대', age: 20 },
{ name: '걸스데이', age: 22 },
{ name: '티아라', age: 23 },
{ name: '애프터스쿨', age: 25 } ]
slice() 로 잘라낸 후 Users2
[ { name: '걸스데이', age: 22 }, { name: '티아라', age: 23 } ]
slice() 로 잘라낸후 Users3
[ { name: '티아라', age: 23 } ]


1


var Users=[{name:'소녀시대',age:20},{name:'걸스데이',age:22},{name:'티아라',age:23}];

console.log('delete 키워드로 배열 요소 삭제 전 배열 요소의 수 : %d',Users.length);


delete Users[1];


console.log('delete 키워드로 배열 요소 삭제 후');

console.dir(Users);


Users.splice(1,0,{name:'애프터스쿨',age:25});

console.log('splice()로 요소 인덱스 1에 추가한후 ')

console.dir(Users)


Users.splice(2,1);

console.log('splice()로 인덱스 2의 요소를 1개 삭제후')

console.dir(Users)


실행후 : 

delete 키워드로 배열 요소 삭제 전 배열 요소의 수 : 3
delete 키워드로 배열 요소 삭제 후
[ { name: '소녀시대', age: 20 },
<1 empty item>,
{ name: '티아라', age: 23 } ]
splice()로 요소 인덱스 1에 추가한후
[ { name: '소녀시대', age: 20 },
{ name: '애프터스쿨', age: 25 },
<1 empty item>,
{ name: '티아라', age: 23 } ]
splice()로 인덱스 2의 요소를 1개 삭제후
[ { name: '소녀시대', age: 20 },
{ name: '애프터스쿨', age: 25 },
{ name: '티아라', age: 23 } ]


1


문제 설명

직사각형을 만드는 데 필요한 4개의 점 중 3개의 좌표가 주어질 때, 나머지 한 점의 좌표를 구하려고 합니다. 점 3개의 좌표가 들어있는 배열 v가 매개변수로 주어질 때, 직사각형을 만드는 데 필요한 나머지 한 점의 좌표를 return 하도록 solution 함수를 완성해주세요. 단, 직사각형의 각 변은 x축, y축에 평행하며, 반드시 직사각형을 만들 수 있는 경우만 입력으로 주어집니다.

제한사항
  • v는 세 점의 좌표가 들어있는 2차원 배열입니다.
  • v의 각 원소는 점의 좌표를 나타내며, 좌표는 [x축 좌표, y축 좌표] 순으로 주어집니다.
  • 좌표값은 1 이상 10억 이하의 자연수입니다.
  • 직사각형을 만드는 데 필요한 나머지 한 점의 좌표를 [x축 좌표, y축 좌표] 순으로 담아 return 해주세요.

입출력 예
vresult
[[1, 4], [3, 4], [3, 10]][1, 10]
[[1, 1], [2, 2], [1, 2]][2, 1]
입출력 예 설명

입출력 예 #1
세 점이 [1, 4], [3, 4], [3, 10] 위치에 있을 때, [1, 10]에 점이 위치하면 직사각형이 됩니다.

입출력 예 #2
세 점이 [1, 1], [2, 2], [1, 2] 위치에 있을 때, [2, 1]에 점이 위치하면 직사각형이 됩니다.


# 내가 생각한 방식
# 새로운 리스트를 만들어서 x 값과 y 값을 따로 담는다
# 따로 담은값에서 1개만 들어있는 값은 나머지 변이므로 해당값만 돌려 받는다
# 돌려받은 값으로 4개의 변을 만들고 4번째 값만 retrun 해준다


def solution(v):
x = [0] * 4
y = [0] * 4
answer = []
for i in range(0,3):
x[i] = v[i][0]
y[i] = v[i][1]


# print(x)
# print(y)
answer = []
for z in range(0,3):
if x.count(x[z]) == 1:
x[3] = x[z]
if y.count(y[z]) == 1:
y[3] = y[z]
answer = [x[3],y[3]]
print(answer)
return answer


문제 설명

길이가 n인 배열에 1부터 n까지 숫자가 중복 없이 한 번씩 들어 있는지를 확인하려고 합니다.
1부터 n까지 숫자가 중복 없이 한 번씩 들어 있는 경우 true를, 아닌 경우 false를 반환하도록 함수 solution을 완성해주세요.

제한사항
  • 배열의 길이는 10만 이하입니다.
  • 배열의 원소는 0 이상 10만 이하인 정수입니다.

입출력 예
arrresult
[4, 1, 3, 2]true
[4, 1, 3]false
입출력 예 설명

입출력 예 #1
입력이 [4, 1, 3, 2]가 주어진 경우, 배열의 길이가 4이므로 배열에는 1부터 4까지 숫자가 모두 들어 있어야 합니다. [4, 1, 3, 2]에는 1부터 4까지의 숫자가 모두 들어 있으므로 true를 반환하면 됩니다.

입출력 예 #2
[4, 1, 3]이 주어진 경우, 배열의 길이가 3이므로 배열에는 1부터 3까지 숫자가 모두 들어 있어야 합니다. [4, 1, 3]에는 2가 없고 4가 있으므로 false를 반환하면 됩니다.


문제 출처 : https://programmers.co.kr


시간만족도.. 처음 접하였을때 뭐 이런것까지 생각해야하나.. 때문에 풀리지 않았다.. 지금도 완벽히 알고있지는 않지만.

놀라운부분을 알게되었다.


위의 문제를 접하였을때 


def solution(arr):
if len(arr) != max(arr):
return False

if len(arr) == max(arr):
testlist = [0]*len(arr)
for i in range(0,len(arr)):
testlist[i] = arr.count(i+1)
if testlist.count(2) or testlist.count(0):
return False
else:
return True


나는 이렇게 문제를 해결하였다. 

그런데 시간만족도가 만족이 되지 않다는것을 알게되었고. 

좀더 많은 경우의 수를 앞에서 걸러볼까 고민고민하다가.. 


for 문에서 O(n) 의 문제로 인한것도 확인하게되었다.


그럼 어떻게 해결할까 고민하였고 생각해보니. 두번째 방안으로 정렬 sort 를 먼저 한후 

차례로 비교시키도록 하고 while 문을 이용해 보는 방법도 떠오르게 되었다.


def solution(arr):
arr.sort()
i = 1
while i <= len(arr):
print(arr[i-1],i)
if arr[i-1] != i :
print("false")
return False
i = i + 1
return True


이렇게 하였을 경우는 시간만족도와 공간만족도가 해결되었다.. 


False 의 경우 리턴의 확률이 1번보다는 훨씬 응답이 빠르기때문에 오는 결과 같았다.


주구장창 for 문만 쓰던나에게.... 시간만족도와 공간만족도부분은 새로운 충격이였다.. 공부할께 너무너무 많다.. ㅜ 


for 문의 항상 나쁜것은 아니였다 다른 문제의 경우 .


문제 설명

자연수 N이 주어지면, N의 각 자릿수의 합을 구해서 return 하는 solution 함수를 만들어 주세요.
예를들어 N = 123이면 1 + 2 + 3 = 6을 return 하면 됩니다.

제한사항
  • N의 범위 : 100,000,000 이하의 자연수

입출력 예
Nanswer
1236
98724
입출력 예 설명

입출력 예 #1
문제의 예시와 같습니다.

입출력 예 #2
9 + 8 + 7 = 24이므로 24를 return 하면 됩니다.


def solution(n):

ts = time.time()
n = str(n)
ex_sum = 0
for i in range(0,len(n)):
ex_sum = ex_sum + int(n[i])

answer = ex_sum
print(ex_sum)
nowtime = time.time()- ts
print(nowtime)
print("------------------------------------")
return answer


일부러 시간을 계산해보기 위하여 많은 값을 넣어보았다. 

for 문을 썻기때문에 시간만족도가 성립하지 않았겠지 싶어서


def solution(n):
ts = time.time()
ex_sum = 0
while n>0:
ex_sum = ex_sum + n%10
n = n // 10


nowtime = time.time()- ts
print(nowtime)
print(ex_sum)


#return answer


while 문을 써보았다 


무수히 많은 값을 넣었을때 시간을 재기위해서 타임스템프를 기록하였고 확인해본결과


1번

결과값 : 155688

소요시간 : 0.02316761016845703

------------------------------------

2번

소요시간 : 0.7799994945526123

결과값 : 155688


1번이 훨씬더 빠른 결과값을 가져오는걸 알수있었다..


때에따라서 알맞은 방식을 써야 하는것 같다.. ㅠㅠ 너무 어렵다.. 

'개발메모장 > coding' 카테고리의 다른 글

Codoing 연습 나머지 한점 python  (0) 2018.11.05

#오라클 DB 계정 생성 및 사용자 확인

오라클의 관리자 계정은 DBA 권한을 가지고 있어야 하며, 오라클 설치 시 기본적으로 Scott(사용자)가 자동 생성됨


서버에서 ORACLE 접속시


su - oracle

sqlplus '/as sysdba'


현재 생성된 계정 확인

SELECT * From DBA_USERS;

SELECT * FROM ALL_USERS;


사용자에게 부여된 시스템 권한 확인

SELECT * FROM DBA_SYS_PRIVX

WHERE GRANTEE = '사용자명';


사용자에게 부여된 롤 확인

SELECT * FROM DBA_ROLE_PRIVS

WHERE GRANTEE = '사용자명' ;


사용자에게 부여된 롤에 부여된 시스템 권한 확인

SELECT * FROM DBA_SYS_PRIVS

WHERE GRANTEE = '롤명' ;


타 사용자에게 부여한 객체(테이블 등) 권한 확인

SELECT * FROM DBA_TAB_PRIVS

WHERE OWNER = '테이블소유자명' ;
또는
SELECT * FROM DBA_TAB_PRIVS
WHERE GRANTEE = '권한부여자명' ;


사용자가 소유한 모든 테이블 확인

SELECT 테이블명 FROM USER_TABLES;


계정 생성

CREATE USER 계정명 IDENTIFIED BY 비밀번호;


계정 비밀번호 변경

ALTER USER 계정명 IDENTIFIED BY 변경할비밀번호;

  • 변경할 비밀번호는 문자로 시작해야합니다.


계정 권한 할당

GRANT CREATE 권한명 TO 계정;

  • 시스템 권한

  • 시스템 권한 종류

     내용

     CREATE USER

     데이터 베이스 유저 생성 권한

     SELECT ANY TABLE

     모든 유저의 테이블 조회 권한

     CREATE ANY TABLE

     모든 유저의 테이블 생성 권한

     CREATE SESSION

     데이터베이스 접속 권한

     CREATE TABLE

     테이블 생성 권한

     CREATE VIEW

     뷰 생성 권한

     CREATE PROCED USER

     프로시저 생성 권한

     CREATE SEQUENCE

     시퀀스 생성 권한

     SYSDBA

     데이터베이스를 관리하는 최고 권한

     SYSOPER

     데이터베이스를 관리는 권한

REVOKE 권한 제거
REVOKE 권한명 (시스템 명령 또는 SQL 명령) ON 테이블명 FROM 계정;


계정 삭제

DROP USER 계정명 CASCADE;


참고 링크


깃 허브 또는 SVN에서 프로젝트를 커밋할시

제외해야 할 파일,폴더 들이 몇 가지가 있다.


대표적으로 target 폴더인데 먼저 target 폴더에 대해 알아보면,

Maven으로 빌드를 하면 생기는 jar 파일을

저장하는 것이 주요 일이다.


개발을 할때는 이클립스 안에서 모든것이 이루어 지기 때문에 중요하지

않지만 나중에 프로젝트 결과물인 jar또는 war를 실서버에 반영할 때에는

target폴더 밑에 있는 jar나 war를 배포하게 된다.


target 폴더를 모르고 삭제했다면 Maven Build를 하여 다시 만들수 있다.

이러한 이유 들로 target폴더는 커밋의 대상이 아니다. 


target 폴더 이외에 .project .classpath .settings 등도

커밋의 대상이 아니다. 먼저 이 파일들을 커밋하지 않게

ignored 시키는 방법에 대해 알아보자.


이클립스든 전자정부프레임워크든 방법은 똑같다.

아래 이미지 순서대로 실행하자.


위의 순서대로 약4가지 정도의 파일을 ignored 시키자.


출처 : http://rwd337.tistory.com/179


레지스트리 편집: 윈도우 탐색기의 새로 고침 기능 자동화하기

윈도우 탐색기의 '새로 고침' 기능 자동화하기
윈도우 탐색기나 '내 컴퓨터'에서 파일이나 폴더를 복사, 삭제, 이동하면 결과가 바로바로 나타나지 않습니다. 결과를 확인 하려면 작업을 마치고 '보기->새로 고침'을 차례로 선택하거나 <F5> 키를 눌러야 합니다.
만약 이런 번거로운 과정없이 윈도우 탐색기나 '내 컴퓨터'에서 작업한 내용을 곧바로 확인하고 싶으면 레지스트리를 편집해야 합니다.
1.레지스트리 편집기를 실행하기 위해 윈도우에서 ‘시작→실행’을 눌러 ‘regedit’를 입력해 레지스트리 편집기를 실행합니다.
사진 : regedit 입력
2. 레지스트리 편집기에서 'HKEY_LOCAL_MACHINE->SYSTEM->CurrentControlSet->Control->Update'키로 들어간 다음 오른쪽 창에서 'UpdateMode'를 더블클릭 합니다.
사진 : 'UpdateMode'를 더블 클릭
3. 'DWORD 값 편집' 상자가 나타나면 '단위'는 '16진수', '값 데이터' '0'으로 설정하고, '확인' 버튼을 누릅니다.
사진 : '값 데이터'는 '0'으로 설정
4. 끝으로 바탕화면을 클릭하고 <F5>키를 누르면 이후 부터는 윈도우 탐색기나 '내 컴퓨터'에서 곧바로 작업한 내용을 확인할 수 있습니다.
   경고:
윈도우 레지스트리를 편집하는 과정은 편집에 능숙한 개인에게만 권장됩니다. HP는 레지스트리 편집 과정에서 잘못 실행되어, Windows에 손상이 가는 경우에 대하여 책임지지 않습니다.

츌처 : https://support.hp.com/kr-ko/document/c00641058

사용방법 : https://developers.google.com/youtube/v3/code_samples/python?hl=ko


유투브 api 깃허브 : https://github.com/youtube/api-samples


python search.py --q=surfing --max-results=10


선결 요건

  • Python 2.6 이상

  • pip 패키지 관리 도구

  • Python 용 Google API 클라이언트 라이브러리 :

    pip install --upgrade google-api-python-client
    
  • 사용자 인증을 위해 google-auth, google-auth-oauthlib 및 google-auth-httplib2

    pip install --upgrade google-auth google-auth-oauthlib google-auth-httplib2
    

프로젝트 설정 및 코드 샘플 실행

  1. API 콘솔에서 프로젝트를 만들고 웹 응용 프로그램의 자격 증명을 설정합니다. 승인 된 리디렉션 URI를 적절하게 설정하십시오.

  2. 자격 증명과 관련된 client_secrets.json 파일을 로컬 파일에 저장하십시오.

  3. 전체 코드 샘플을 client_secrets.json 파일과 동일한 디렉토리의 로컬 파일에 복사하거나 샘플을 수정하여 해당 파일의 위치를 ​​정확하게 식별하십시오.

  4. 명령 행에서 샘플을 실행하고 필요에 따라 명령 행 인수를 설정하십시오.

    python sample.py --arg1=value1 --arg2=value2 ...

  5. 대부분의 샘플은 STDOUT에 무언가를 인쇄합니다. YouTube 웹 사이트에서 재생 목록이나 채널 섹션을 생성하는 요청과 같이 데이터를 쓰는 요청의 효과를 확인할 수도 있습니다.

이 디렉토리의 샘플 :

채널 섹션 추가

메서드 : youtube.channelSections.insert 
설명 :이 샘플은 API의 channelSections.insert메서드를 호출하여 채널 섹션을 만듭니다. 이 코드는 섹션의 유형, 표시 스타일, 제목, 위치 및 내용을 지정할 수있는 여러 명령 행 인수를 허용합니다. 

또한이 샘플은 채널 brandingSettings.channel.showBrowseView 이 피드보기가 아닌 탐색보기에서 내용을 표시하도록 채널 속성을 업데이트합니다 채널의 섹션은 채널이 탐색보기의 내용을 표시하는 경우에만 표시됩니다. 

채널 섹션에 대한 자세한 내용은 YouTube 도움말 센터를 참조하십시오 .

채널 구독 추가

메서드 : youtube.subscriptions.insert 
설명 :이 샘플은 API의 subscriptions.insert메서드를 호출하여 지정된 채널에 구독을 추가합니다.

추천 동영상 추가

메서드 : youtube.channels.update 
설명 :이 샘플은 API의 channels.update메서드를 호출 invideoPromotion 하여 채널의 속성 을 설정 합니다.

재생 목록 만들기

메서드 : youtube.playlists.insert 
설명 :이 샘플은 API의 playlists.insert메서드를 호출 하여 요청을 허가 한 채널이 소유 한 비공개 재생 목록을 만듭니다.

주석 작성 및 관리

방법 : youtube.commentThreads.list, youtube.comments.insert, youtube.comments.list, youtube.comments.update, youtube.comments.setModerationStatus, youtube.comments.markAsSpam, youtube.comments.delete 
설명 :이 샘플에서는 다음 API 메소드를 사용하여 주석을 작성하고 관리하십시오.

  • 이 commentThreads.list메소드는 videoId매개 변수가 설정된 메소드를 호출하여 비디오에 대한 주석을 검색합니다.
  • 매개 변수가 설정된 comments.insert메소드를 호출하여 parentId기존 주석에 응답합니다.
  • 이 comments.list메소드는 parentId매개 변수 와 함께 메소드를 호출하여 스레드의 주석을 검색합니다.
  • comments.update요청 본문에 주석이 있는 메소드를 호출하여 주석을 업데이트합니다.
  • comments.setModerationStatus메소드를 호출하여 주석의 검토 상태 comments.markAsSpam, 주석을 스팸으로 표시하는 comments.delete메소드 및 주석을 삭제하는 메소드를 id호출 하여 매개 변수를 사용하여 주석을 식별합니다.

댓글 쓰레드 생성 및 관리

메소드 : youtube.commentThreads.insert, youtube.commentThreads.list, youtube.commentThreads.update 
설명 :이 샘플은 다음 API 메소드를 사용하여 최상위 레벨 주석을 작성하고 관리하는 방법을 보여줍니다.

  • 이 commentThreads.insert메서드는 channelId매개 변수를 사용 하여 메서드를 한 번 호출하여 채널 주석을 만들고 매개 변수를 사용하여 한 번 videoId비디오 주석을 만듭니다.
  • 이 commentThreads.list메서드는 channelId매개 변수를 사용 하여 메서드를 한 번 호출하여 채널 주석 videoId을 검색 하고 매개 변수를 사용하여 비디오 주석을 검색합니다.
  • commentThreads.update메서드를 호출하여 비디오 주석을 업데이트 한 다음 채널 주석을 다시 업데이트합니다. 각 경우에 요청 본문에는 comment업데이트 되는 리소스가 포함됩니다.

YouTube 동영상 캡션 트랙 만들기 및 관리

메소드 : youtube.captions.insert, youtube.captions.list, youtube.captions.update, youtube.captions.download, youtube.captions.delete 
설명 :이 샘플은 다음 API 메소드를 사용하여 YouTube 비디오 캡션을 만들고 관리하는 방법을 보여줍니다. 트랙 :

  • 매개 변수가로 설정된 captions.insert메소드를 호출하여 초안 상태의 캡션 트랙을 업로드합니다.isDrafttrue
  • 이 captions.list메소드는 videoId매개 변수 가있는 메소드를 호출하여 비디오 자막 트랙을 검색합니다.
  • captions.update요청 본문의 캡션이 있는 메서드를 호출하여 캡션 트랙을 업데이트합니다.
  • captions.download자막 트랙을 다운로드 하는 메서드를 호출합니다 .
  • 이 captions.delete메서드는 id매개 변수를 사용하여 캡션 트랙을 식별 하는 메서드를 호출하여 캡션 트랙을 삭제합니다 .

비디오처럼

메소드 : youtube.videos.rate 
설명 :이 샘플은 API의 videos.rate메소드를 호출하여 동영상의 긍정적 인 등급을 설정합니다.

채널 게시판 게시

메서드 : youtube.activities.insert 
설명 :이 샘플에서는 API의 activities.insert메서드를 호출 하여 요청과 연결된 채널에 게시판을 게시합니다.

채널에서 워터 마크 이미지 제거

메서드 : youtube.watermarks.unset 
설명 :이 샘플은 API의 watermarks.unset메서드를 호출하여 채널의 워터 마크 이미지를 제거합니다. 요청은 동영상을 소유 한 채널에 의해 승인되어야합니다.

내 업로드 검색

메서드 : youtube.playlistItems.list 
설명 :이 샘플에서는 API의 playlistItems.list메서드를 호출 하여 요청과 연결된 채널에 업로드 된 동영상 목록을 검색합니다. 또한 코드는 매개 변수가로 설정된 channels.list메소드를 호출 하여 채널의 업로드 된 동영상을 식별하는 재생 목록 ID를 검색합니다.minetrue

키워드 검색

메서드 : youtube.search.list 
설명 :이 샘플에서는 API의 search.list메서드를 호출하여 특정 키워드와 관련된 검색 결과를 검색합니다.

위치 검색

방법 : youtube.search.list, youtube.videos.list 
설명 :이 샘플은 API의 호출 search.list와 방법을 typeqlocation, 및 locationRadius특정 위치를 중심으로 반경 내에서 제공되는 키워드와 일치하는 검색 결과를 검색 매개 변수를 설정합니다. 샘플은 검색 결과의 동영상 ID를 사용하여 API의 videos.list메소드를 호출하여 각 동영상의 위치 세부 정보를 검색합니다.

지역화 된 채널 메타 데이터 설정 및 검색

메소드 : youtube.channels.update, youtube.channels.list 
설명 :이 샘플은 다음 API 메소드를 사용하여 채널의 지역화 된 메타 데이터를 설정하고 검색하는 방법을 보여줍니다.

  • channels.update메소드를 호출하여 채널 메타 데이터의 기본 언어를 업데이트하고이 언어의 현지화 된 버전을 선택한 언어로 추가합니다. 채널 리소스의 기본 언어를 설정하려면 실제로 brandingSettings.channel.defaultLanguage속성 을 업데이트해야 합니다.
  • 특정 언어로 설정된 매개 변수를 사용 하여 channels.list메서드를 호출하여 hl해당 언어의 지역화 된 메타 데이터를 검색합니다.
  • 그것은 호출 channels.list방법 및 포함 localizations에서 part 해당 채널에 대한 국부 모든 메타 데이터를 검색하는 파라미터 값.

지역화 된 채널 섹션 메타 데이터 설정 및 검색

메서드 : youtube.channelSections.update, youtube.channelSections.list 
설명 :이 샘플은 다음 API 메서드를 사용하여 채널 섹션의 지역화 된 메타 데이터를 설정하고 검색하는 방법을 보여줍니다.

  • channelSections.update메서드를 호출하여 채널 섹션의 메타 데이터의 기본 언어를 업데이트하고이 언어의 현지화 된 버전을 선택한 언어로 추가합니다.
  • 특정 언어로 설정된 매개 변수를 사용 하여 channelSections.list메서드를 호출하여 hl해당 언어의 지역화 된 메타 데이터를 검색합니다.
  • 그것은 호출 channelSections.list방법 및 포함 localizations에서 part해당 채널 영역에 대한 지역화 모든 메타 데이터를 검색하는 파라미터 값.

지역화 된 재생 목록 메타 데이터 설정 및 검색

메서드 : youtube.playlists.update, youtube.playlists.list 
설명 :이 샘플은 다음 API 메서드를 사용하여 재생 목록의 지역화 된 메타 데이터를 설정하고 검색하는 방법을 보여줍니다.

  • 이 playlists.update메서드는 재생 목록의 메타 데이터의 기본 언어를 업데이트하고이 언어의 현지화 된 버전을 선택한 언어로 추가하는 메서드를 호출합니다 .
  • 특정 언어로 설정된 매개 변수를 사용 하여 playlists.list메서드를 호출하여 hl해당 언어의 지역화 된 메타 데이터를 검색합니다.
  • 그것은 호출 playlists.list방법 및 포함 localizations에서 part 그 재생을 위해 국부 모든 메타 데이터를 검색하는 파라미터 값.

지역화 된 비디오 메타 데이터 설정 및 검색

메서드 : youtube.videos.update, youtube.videos.list 
설명 :이 샘플은 다음 API 메서드를 사용하여 비디오의 지역화 된 메타 데이터를 설정하고 검색하는 방법을 보여줍니다.

  • 이 videos.update메서드는 비디오 메타 데이터의 기본 언어를 업데이트하고 선택한 언어로이 메타 데이터의 지역화 된 버전을 추가하는 메서드를 호출합니다 .
  • 특정 언어로 설정된 매개 변수를 사용 하여 videos.list메서드를 호출하여 hl해당 언어의 지역화 된 메타 데이터를 검색합니다.
  • 그것은 호출 videos.list방법 및 포함 localizations에서 part 해당 동영상 국부적 모든 메타 데이터를 검색하는 파라미터 값.

기존 채널 섹션 섞기

메소드 : youtube.channelSections.list, youtube.channelSections.update 
설명 :이 샘플은 API의 channelSections.list메소드를 호출하여 현재 채널 섹션의 목록을 가져옵니다. 그런 다음 목록을 섞어서 channelSections.update각 항목의 위치를 ​​변경합니다. 

채널 섹션에 대한 자세한 내용은 YouTube 도움말 센터를 참조하십시오 .

비디오 업데이트

메소드 : youtube.videos.update 
설명 :이 샘플은 API의 videos.update메소드를 호출 하여 요청을 승인하는 채널이 소유 한 비디오를 업데이트합니다.

배너 이미지 업로드 및 채널 배너로 설정

메소드 : youtube.channelBanners.insert, youtube.channels.update 
설명 :이 샘플은 API의 channelBanners.insert메소드를 호출하여 이미지를 업로드합니다. 반환 된 URL을 사용하면 샘플에서 channels.update메서드를 호출 하여 채널 배너를 해당 이미지로 업데이트 할 수 있습니다.

동영상 업로드

메소드 : youtube.videos.insert 
설명 :이 샘플은 API의 videos.insert메소드를 호출 하여 요청과 관련된 채널에 비디오를 업로드합니다.

동영상 미리보기 이미지 업로드

메소드 : youtube.thumbnails.set 
설명 :이 샘플은 API의 thumbnails.set메소드를 호출하여 이미지를 업로드하고이를 동영상의 미리보기 이미지로 설정합니다. 요청은 동영상을 소유 한 채널에 의해 승인되어야합니다.

워터 마크 이미지 업로드 및 채널 설정

Method: youtube.watermarks.set
Description: This sample calls the API's watermarks.set method to upload an image and set it as the watermark image for a channel. The request must be authorized by the channel that owns the video.

Create a broadcast and stream

Method: youtube.liveBroadcasts.bind,youtube.liveBroadcasts.insert,youtube.liveStreams.insert
Description: This sample calls the API's liveBroadcasts.insert and liveStreams.insert methods to create a broadcast and a stream. Then, it calls the liveBroadcasts.bind method to bind the stream to the broadcast.

Retrieve a channel's broadcasts

메서드 : youtube.liveBroadcasts.list 
설명 :이 샘플은 API의 liveBroadcasts.list메서드를 호출 하여 요청과 연결된 채널의 브로드 캐스트 목록을 검색합니다. 기본적으로 요청은 채널에 대한 모든 브로드 캐스트를 검색하지만 --broadcast-status특정 상태의 브로드 캐스트 만 검색 하도록 옵션 의 값을 지정할 수도 있습니다 .

채널의 라이브 비디오 스트림 검색

메소드 : youtube.liveStreams.list 
설명 :이 샘플은 API의 liveStreams.list메소드를 호출하여 채널이 YouTube의 실시간 이벤트를 방송하는 데 사용할 수있는 비디오 스트림 설정 목록을 검색합니다.

viewcount별로 상위 10 개 동영상 검색

Method: youtubeAnalytics.reports.query
Description: This sample calls the API's reports.query method to retrieve YouTube Analytics data. By default, the report retrieves the top 10 videos based on viewcounts, and it returns several metrics for those videos, sorting the results in reverse order by viewcount. By setting command line parameters, you can use the same code to retrieve other reports as well.

Create a reporting job

Method: youtubeReporting.reportTypes.list, youtubeReporting.jobs.create
Description: This sample demonstrates how to create a reporting job. It calls the reportTypes.list method to retrieve a list of available report types. It then calls the jobs.create method to create a new reporting job.

Retrieve reports

방법 : youtubeReporting.jobs.list, youtubeReporting.reports.list 
설명 :이 샘플은 특정 작업에서 생성 된 보고서를 검색하는 방법을 보여줍니다. jobs.list보고 작업을 검색 하는 메소드를 호출합니다 그런 다음 특정 작업 ID로 설정된 매개 변수로 reports.list메소드 를 호출하여 jobId해당 작업으로 작성된 보고서를 검색합니다. 마지막으로 샘플은 각 보고서의 다운로드 URL을 인쇄합니다.

Scrapy 기초

Scrapy는 2008년에 처음 0.7버전으로 공개되었다고 합니다. 

그만큼 오랫동안 사용되어 왔고, 안정성을 갖추고 있다고 알려져 있습니다. 웹 스크래핑을 본격적으로 하는 경우에 있어, Scrapy를 사용하는 것이 성능상 매우 큰 이점을 갖게 될 것입니다.

빠르고 안정적인 성능 외에도 스크래피의 장점을 들어보자면, 일단 깨진 HTML을 이해합니다.

Scrapy에서 직접 BeautifulSoup 또는 lxml을 사용할 수 있습니다. 하지만 스크래피는 XPath 인터페이스인 selectors를 제공하고, 이것으로 깨진 HTML 코드와 혼란스러운 인코딩을 효율적으로 수행할 수 있게 해줍니다.

Scrapy는 본래 웹 스크래핑을 위해 디자인 되었지만, API를 사용해서 데이터를 추출하거나 일반적인 웹 크롤러 목적으로도 사용할 수 있습니다.

* 보통 크롤링과 스크래핑을 혼용하지만, 웹 크롤링은 모든 데이터를 가져오는 것으로, 웹 스크래핑은 특정 데이터만 추출하는 것으로 구분할 수 있습니다.

Scrapy 라이브러리를 제대로 배우기 위해서는 많은 시간과 노력이 필요할 것입니다. 이번 정리에서는 기본적으로 크롤링을 하는 방법을 알아보도록 할 것입니다.  

1) 새로운 Scrapy 프로젝트 생성

2) 추출할 아이템 정의

3) 사이트를 크롤링하고 아이템을 추출하기 위해 스파이더 작성

4) 추출된 아이템을 저장하기 위해 아이템 파이프라인 작성

(이미 Scrapy가 설치되어 있다고 가정하겠습니다. 전 제 맥에서 pip install scrapy로 설치했습니다)


1. 새로운 Scrapy 프로젝트 생성

스크래핑을 시작하기 전에, 가장 먼저 해야 할 일은 새로운 Scrapy 프로젝트를 설정하는 것입니다. 

파이썬을 실행하고, 아래 코드를 입력합니다.

>>> scrapy start project tutorial

이것은 다음 콘텐츠를 가진 tutorial 디렉토리를 생성할 것입니다.


tutorial/

    scrapy.cfg # 설정 파일을 배치


    tutorial/ # 프로젝트의 파이썬 모듈, 여기에서 당신 코드를 임포트할 것입니다.

        __init__.py


        items.py # 프로젝트 아이템 파일

        pipelines.py # 프로젝트 파이프라인 파일

        settings.py # 프로젝트 설정 파일

        spiders/ # 나중에 당신의 스파이더들이 들어갈 디렉토리

        __init__.py

        ...


2. 아이템 정의

아이템은 스크랩한 데이터를 싫은 콘테이너라고 할 수 있습니다. 이것은 파이썬 딕셔너리처럼 동작합니다. 아이템은 scrapy.item 클래스를 생성함으로써 선언됩니다. 그리고 ORM과 매우 유사하게 scrapy.Field 오브젝트로 속성이 정의됩니다. 

예를 들자면, 우리가 어떤 사이트의 타이틀, url, 사이트 설명을 캡처하고 싶다면, 우리는 이 세가지 데이터를 위해 필드를 각각 정의해야 합니다. 

앞에서 생성된 items.py 파일을 다음과 같이 에디트합니다.

import scrape


class DmozItem(scrape.Item):

    title = scrape.Field()

    link = scrape.Field()

    desc = scrapy.Field()


3. 스파이더 작성

스파이더는 작성자가 직접 정의하는 클래스입니다. 

Scrapy는 도메인 또는 그룹 도메인에서 정보를 스크랩하기 위해 사용합니다. 

제일 먼저 다운로드할 URLs의 첫번째 리스트를 정의합니다. 

그리고 아이템을 추출하기 위해 어떻게 페이지 콘텐츠를 읽어들일지 정의합니다.

그럼 스파이더를 생성해 보도록 하겠습니다.

import scrapy


class Dmozspider(scrapy.Spider):

    name = “dmoz”

    allowed_domains = [“dmoz.org”]

    start_urls = [

http://www.dmoz.org/Computers/Programming/Languages/Python/Books/“,

http://www.domz.org/Computers/Programming/Languages/Python/Resources/“

    ]


    def parse(self, response):

        filename = response.url.split(“/“)[-2] + ‘.html’

        with open(filename, ‘wb’) as f:

            f.write(response.body)

위의 예를 보면, scrapy.Spider를 서브 클래스로 받았습니다. 그리고 몇가지 속성을 정의했다는 것을 알 수 있습니다.

- name : 스파이더를 알아보게 하는 용도로 씁니다. 그래서 고유한 이름을 써야 합니다. 즉, 다른 스파이더와 동일한 이름을 설정할 수 없습니다.

- start_urls : 스파이더가 크롤링을 시작하는 URLs입니다. 다운로드한 첫번째 페이지는 여기부터 시작합니다. 하위 URLs는 여기 시작 URLs에 포함된 데이터에서 생성될 것입니다.

- parse() : 각 시작 URL의 다운로드한 Response 객체와 함께 불러오는 스파이더의 메서드입니다. 

그럼, 위에 작성한 스파이더를 동작시키기 위해, 프로젝트 최상위 디렉토리에서 다음 명령어를 실행합니다. 

>>> scrapy crawl dmoz

위 명령어는 우리가 추가한 dmoz 이름을 가진 스파이더를 실행합니다. 이것은 'dmoz.org' 도메인에 몇가지 request를 보낼 것입니다. 아래와 유사한 output을 받게 될 것입니다.

2014-01-23 18:13:07-0400 [scrapy] INFO: Scrapy started (bot: tutorial)

2014-01-23 18:13:07-0400 [scrapy] INFO: Optional features available: ...

2014-01-23 18:13:07-0400 [scrapy] INFO: Overridden settings: {}

2014-01-23 18:13:07-0400 [scrapy] INFO: Enabled extensions: ...

2014-01-23 18:13:07-0400 [scrapy] INFO: Enabled downloader middlewares: ...

2014-01-23 18:13:07-0400 [scrapy] INFO: Enabled spider middlewares: ...

2014-01-23 18:13:07-0400 [scrapy] INFO: Enabled item pipelines: ...

2014-01-23 18:13:07-0400 [scrapy] INFO: Spider opened

2014-01-23 18:13:08-0400 [scrapy] DEBUG: Crawled (200) <GET http://www.dmoz.org/Computers/Programming/2014-01-23 18:13:09-0400 [scrapy] DEBUG: Crawled (200) <GET http://www.dmoz.org/Computers/Programming/2014-01-23 18:13:09-0400 [scrapy] INFO: Closing spider (finished)


3-1. Selectors 소개 

웹 페이지에서 데이터를 추출하기 위해서는 몇가지 방법이 있습니다. 

Scrapy에서는 Scrapy Selectors라고 불리는 XPath 또는 CSS에 기반한 메커니즘을 사용합니다. 

XPath 표현과 그 의미를 다음 사례를 통해 기본적으로 이해할 수 있습니다.

    • /html/head/title: HTML 문서의 <head> 요소 안의 <title>요소를 선택하세요.
    • /html/head/title/text(): 앞에서 언급한 <title> 내부의 텍스트를 선택하세요.
    • //td: 모든 <td> 요소를 선택하세요.
    • //div[@class=“mine”]: class=“mine”속성을 포함한 모든 div요소를 선택하세요.

      위 사례는 XPath의 간단한 예제일 뿐입니다. 실제로 더 파워풀하게 사용이 가능합니다. 

      CSS와 XPath로 작업하기 위해, Scrapy는 Selector 클래스를 제공하고 response로부터 무엇을 선택할 것이지에 대한 편리한 단축키를 제공합니다.

      - Selectors는 4가지 기본 메서드를 가지고 있습니다.

      • xpath() :  인수로 주어진 xpath에서 선택된 각 노드를 대표하는 selectors 리스트를 돌려줍니다
      • css() : 인수로 주어진 CSS에서 선택된 각 노드를 대표하는 selectors 리스트를 돌려줍니다
      • extract() : 선택된 데이터와 함께 유니코드 string을 돌려줍니다
      • re() : 인수로 주어진 정규 표현식을 적용해서 추출한 유니코드 string을 돌려줍니다

      4. 스크랩한 데이터 저장 

      스크랩한 데이터를 저장하는 가장 간단한 방법은 크롤링할 때 저장형태를 포함한 다음 명령어를 쓰는 것입니다. 

      >>> scrapy crawl dmoz -o dmoz.json

      위 명령어는 모든 스크랩한 데이터들을 포함한 json 형태의 dmoz.json파일을 생성합니다.

      Scrapy는 기존 파일을 덮어쓰지 않고, 파일에 데이터를 추가합니다. 


      위 예제 및 설명은 www.scrapy.org의 공식 문서를 참고해서 작성했습니다.


      출처 : http://cyan91.tistory.com/11


      Bootstrap 4 


      <head>

        <title>Bootstrap Example</title>

        <meta charset="utf-8">

        <meta name="viewport" content="width=device-width, initial-scale=1">

        <link rel="stylesheet" href="https://maxcdn.bootstrapcdn.com/bootstrap/4.1.3/css/bootstrap.min.css">

        <script src="https://ajax.googleapis.com/ajax/libs/jquery/3.3.1/jquery.min.js"></script>

        <script src="https://cdnjs.cloudflare.com/ajax/libs/popper.js/1.14.3/umd/popper.min.js"></script>

        <script src="https://maxcdn.bootstrapcdn.com/bootstrap/4.1.3/js/bootstrap.min.js"></script>

      </head>


      Bootstrap 3 


      <head>

        <title>Bootstrap Example</title>

        <meta charset="utf-8">

        <meta name="viewport" content="width=device-width, initial-scale=1">

        <link rel="stylesheet" href="https://maxcdn.bootstrapcdn.com/bootstrap/3.3.7/css/bootstrap.min.css">

        <script src="https://ajax.googleapis.com/ajax/libs/jquery/3.3.1/jquery.min.js"></script>

        <script src="https://maxcdn.bootstrapcdn.com/bootstrap/3.3.7/js/bootstrap.min.js"></script>

      </head>

      1


      이클립스에서 깃버튼을 활성화 시킨다.


      이후 Clone a Git Repository and add the clone to this view 를 누른다 


      URI 와 HOST Repository path 를 모를경우 깃에 가면 아래와 같이 복사하는 버튼이 있다 해당버튼을 누르면 자동으로 채워진다.


      여기까지 하면 깃허브 연결이 완료!!


      여기 이후부터는 SVN 등 과 방법이 똑같다. Commit , Update 등 은 모두 같고 한가지 다른점은. 


      Commit 할때 Commit and Push 를 눌러주어야만 파일이 업로드된다. 이후


      공유된 깃 주소에 들어가면


      다음과같이 공유된 프로젝트를 볼수있다. 


      Great Power, Great Responsibility: The 2018 Big Data & AI Landscape


      VIM 명령어 정리


      1. 저장 및 종료

      명령어

      설명

      :w

      저장

      :w file.txt

      file.txt 파일로 저장

      :w » file.txt

      file.tx파일에 덧붙여서 저장

      :q

      vi 종료

      :q!

      vi 강제 종료

      ZZ

      저장 후 종료

      :wq!

      강제 저장 후 종료

      :e file.txt

      file.txt파일을 불러옴

      :e

      현재 파일을 불러옴

      :e#

      바로 이전에 열었던 파일을 불러 옴


      2. 입력모드 전환

      a

      커서 위치 다음칸부터 입력

      A

      커서 행의 맨 마지막부터 입력

      i

      커서의 위치에 입력

      I

      커서 행의 맨 앞에서 부터 입력

      o

      커서의 다음행에 입력

      O

      커서의 이전 행에 입력

      s

      커서 위치의 한글자를 지우고 입력

      cc

      커서위치의 한 행을 지우고 입력


      3. 이동

      h

      왼쪽으로 이동

      l

      오른쪽으로 이동

      j

      아래행으로 이동

      k

      위 행으로 이동

      w 또는 W

      다음 단어의 첫 글자로 이동

      b 또는 B

      이전 단어의 첫 글자로 이동

      e 또는 E

      단어의 마지막 글자로 이동

      <CR>

      다음행   글자로 이동

      ^

      그행의 첫 글자로 이동

      $

      그 행의 마지막 글자로 이동

      +

      다음 행의 첫 글자로 이동

      -

      위 행의 첫 글자로 이동

      (

      이전 문장의 첫 글자로 이동

      )

      다음 문장의 첫 글자로 이동

      {

      이전 문단으로 이동

      }

      다음 문단으로 이동

      H

      커서를 화면 맨 위로 이동

      z<CR>

      현재 행을 화면의 맨우로 이동

      M

      커서를 화면 중안으로 이동

      z.

      현재 행을 화면의 중앙으로 이동

      L

      커서를 화면 최하단으로 이동

      z-

      현재 행의 화면의 최하단으로 이동

      [n]H

      커서를 위에서 n행으로 이동

      [n]L

      커서를 아래에서 n행으로 이동

      ctrl+u

      반 화면 위로 스크롤

      ctrl+d

      반 화면 아래로 스크롤

      ctrl+b

      한 화면 위로 스크롤

      ctrl+f

      한 화면 아래 스크롤

      gg 또는 1G

      문서의 맨 처음으로 이동

      G

      문서의 맨 마지막 행으로 이동

      [n]G 또는 :[n]

      n행으로 이동


      4. 삭제

      x 또는 dl

      커서 위치의 글자 삭제

      X 또는 dh

      커서 바로 앞의 글자 삭제

      dw

      현재 위치부터 스페이스 까지 삭제

      diw

      현재 위치에 있는 단어 삭제

      dd

      커서가 있는 행을 삭제

      [n]dd

      현재 커서 부터 아래 n번째 줄까지 삭제

      dj

      현재 커서와 아래 줄 삭제

      [n]dj

      현재 커서 부터 아래 n+1번째 줄까지 삭제

      dk

      현재 커서와 윗로 n+1번째 줄까지 삭제

      [n]dk

      현재 커서와  줄 삭제

      D 또는 d$

      현재 커서가 있는 위치부터 행 끝까지 삭제

      d0 또는 d^

      현재 커서가 있는 위치부터 행 시작 까지 삭제


      5. 복사 & 붙여넣기

      yy 또는 Y

      커서가 있는 한 행 복사

      p

      현재 커서에 붙여 넣기, 행 복사 일 경우 아래 줄에 붙여넣음.

      P

      현재 커서위치의 앞행에 붙여 넣기, 행 복사일 경우에는  줄에 붙여 넣음

      [n]yy 또는 [n]Y

      커서가 위치한 이후로 n행 복사

      [n]p

      n번 만큼 붙여넣기 반복


      6. 블록 지정

      v

      블록 지정

      V

      줄단위 블록 지정

      ctrl+v(윈도우에서는 ctrl+q)

      비쥬얼 블록 지정

      블록 지정 중 명령

      y

      블록 복사 하기

      r

      치환

      d

      지정 블록 지우기

      U

      대문자로 바꾸기

      u

      소문자로 바꾸기

      ~

      대소문자 전환

      J

      행 합침

      :

      선택 영역에 대하여 ex명령

      <

      행 앞에 탭 제거

      >

      행 앞에 탭 삽입


      7. 문자열 탐색 및 치환

      /[문자열]

      문자열 탐색

      :s/old/new

      현재 행의 처음 old new로 교체

      :s/old/new/g

      현재 행의 모든 old new로 교체

      :10,20s/old/new/g

      10행부터 20행까지 모든 old new로 교체

      [블록지정중]:s/old/new/g

      지정 블록 내에서 모든 old new로 교체

      :-3,+4s/old/new/g

      현재 커서 위치에서 위로 3행 아래로 4행까지의 old new로 교체

      :%s/old/new/g

      문서 전체에서 old new로 교체

      :%s/old/new/gc

      문서 전체에서 old new로 확인하며 교체

      :g/pattern/s/old/new/g

      pattern이 있는 모든 행의 old new로 교체


      8. vim 정규 표현식

      ^

      행의 첫 문자([]안에서는 not의 의미)

      $

      행의 끝

      .

      아무 문자나 한 문자 의미

      \|

      or의 의미

      [ ]

      []사이의 문자 중 하나

      \{min,max\}

      min이상 max이하 반복됨

      *

      앞의 내용이 0번 이상 반복됨

      \+

      앞의 내용이 1번 이상 반복됨

      \<

      단어의 시작

      \>

      단어의 끝

      \n

      새 행 문자

      \t

      탭 문자


      9. vim 확장 정규 표현 문자열

      \i

      변수 지정에 사용되는 문자들 [0-9A-Za-z]

      \I

      \i와 같지만 숫자는 제외

      \k

      keyword로 사용하는 문자 [_\.\-0-9A0Za-z]

      \f

      파일 이름으로 사용하는 문자

      \p

      프린트 가능한 문자

      \P

      \p와 같지만 숫자는 제외

      \s

      whitespace character(공백과 탭)

      \S

      non-whitespace character

      \d

      숫자 [0-9]

      \D

      숫자가 아닌 문자 [^0-9]

      \x

      16진수 숫자 [0-9A-Fa-f]

      \X

      16진수 숫자가 아닌 문자 [^0-9A-Fa-f]

      \o

      8진수 숫자 [0-7]

      \O

      8진수 숫자가 아닌 문자 [^0-7]

      \w

      영문 단어의 시작에 사용되는 문자 [0-9A-Za-z-]

      \W

      영문 단어에서 사용되지 않는 문자 [^0-9A-Za-z-]

      \h

      영문 단어의 시작에 사용되는 문자 [A-Za-z-]

      \H

      영문 단어의 시작에 사용 되지 않는 문자 [^A-Za-z-]

      \a

      모든 알파벳 [A-Za-z]

      \A

      알파벳이 아닌 문자 [^A-Za-z]

      \l

      소문자 [a-z]

      \L

      소문자가 아닌 문자 [a-z]

      \u

      대문자 [A-Z]

      \U

      대문자가 아닌 문자 [^A-Z]

      \e

      Esc

      \t

      Tab

      \r

      캐리지 리턴

      \b

      백스페이스

      \n

      새 행


      10. POSIX 문자 클래스

      문자 클래스

      내용

      [:alnum:]

      알파벳과 숫자 [A-Za-z0-9]

      [:alpha:]

      알파벳 [A-Za-z]

      [:cntrl:]

      제어 문자

      [:blank:]

      탭과 공백 문자

      [:digit:]

      숫자 [0-9]

      [:graph:]

      제어문자와 공백 문자를 제외한 문자

      [:lower:]

      소문자 [a-z]

      [:upper:]

      대문자 [A-Z]

      [:print:]

      제어문자를 제외한 문자, 즉 프린터 할 수 있는 문자

      [:punct:]

      [:graph:]문자 중 [:alnum:]을 제외한 문자. ex)!,@,#,$,%,^....

      [:space:]

      화이트스페이스 ex)공백, , 케리지 리턴, 새행, 수직탭, 폼필드

      [:xdigit:]

      16진수


      11. 파일 버퍼

      :files 또는 :ls 또는 :buffers

      버퍼 목록 나열

      :b[n]

      n번 버퍼로 이동

      :bd[n] 또는 :bw[n]

      n번 버퍼를 삭제 (n이 없으면 현재의 버퍼를 삭제)

      :bp[n]

      이전 버퍼로 이동,n 붙이면 n번만큼 이전 버퍼로 이동

      :bn[n]

      이후 버퍼로 이동,n 붙이면 n번만큼 이후 버퍼로 이동

      :sb[n]

      창을 수평분할 하여 n번 버퍼를 로드

      :bf

      첫 번째 버퍼로 이동

      :bl

      마지막 버퍼로 이동


      12. Tab

      Vim 7.0부터 추가된 기능

      :tabnew

      새로운 탭을 열기

      :tabnew b.txt

      b.txt가 존재하면 열고, 없으면 새로 만들어서 연다

      :tabf b.txt

      b.txt가 존재하면 열고, 없으면 에러 발생

      :tabn[n]

      다음 탭을 열기,n 붙이면 n번 만큼 이동

      :tabp[n]

      이전 탭을 열기,n 붙이면 n번 만큼 이동

      :tabs

      탭 목록 보기

      :tabclose

      탭을 닫기

      :tabfirst

      첫번째 탭을 열기

      :tablast

      마지만 탭을 열기

      :tabdo %s/old/new/g

      모든 탭에 적용을 원할 때 ( 모든탭에서 old new로 변경)


      13. 다중 창 관련 명령

      명령모드

      ex모드

      결과

      창생성

      CTRL-W s

      :[N]sp[plit]

      현재 파일을 두 개의 수평 창으로 나눔

      CTRL-W v

      :[N]vs[plit]

      현재 파일을 두 개의 수직 창으로 나눔

      CTRL-W n

      :new

      새로운 수평 창 생성

      CTRL-W ^ 또는 CTRL-W CTRL-^


      수평 창으로 나누고 이전 파일의 오픈

      CTRL-W f


      창을 수평으로 나누고 커서 위치의 파일 오픈

      CTRL-W i


      커서 위치의 단어가 정의된 파일을 오픈

      창삭제

      CTRL-W q

      :q[uit]!

      현재 커서의 창을 종료

      CTRL-W c

      :close

      현재 커서의 창 닫기

      CTRL-W o

      :on[ly]

      현재 커서의 창만 남기고 모든 창 삭제

      창이동

      CTRL-W h


      왼쪽 창으로 커서 이동

      CTRL-W j


      아래쪽 창으로 커서 이동

      CTRL-W k


      위쪽 창으로 커서 이동

      CTRL-W l


      오른쪽 창으로 커서 이동

      CTRL-W w


      창을 순차적으로 이동

      CTRL-W p


      가장 최근에 이동한 방향으로 이동

      CTRL-W t


      최상위 창으로 이동

      CTRL-W b


      최하위 창으로 이동

      창이동

      CTRL-W r


      순착으로 창의 위치를 순환

      CTRL-W x


      이전 창과 위치를 바꿈

      CTRL-W H


      현재창을 왼쪽 큰화면으로 이동

      CTRL-W J


      현재창을 아래쪽 큰화면으로 이동

      CTRL-W K


      현재창을 위쪽 큰화면으로 이동

      CTRL-W L


      현재창을 오른쪽 큰화면으로 이동

      창 크기 조정

      CTRL-W =


      창의 크기를 모두 균등하게 함

      CTRL-W _


      수평 분할에서 창의 크기를 최대화

      CTRL-W |


      수직 분할에서 창의 크기를 최대화

      CTRL-W [N]+

      :res[ize] +N

      창의 크기를 N행 만큼 증가

      CTRL-W [N]-

      :res[ize] -N

      창의 크기를 N행 만큼 감소

      CTRL-W [N]>


      창의 크기를 오른쪽으로 N칸 만큼 증가

      CTRL-W [N]<


      창의 크기를 오른쪽으로 N칸 만큼 감소

      다중창 사용의 경우 대부분 붙여서 사용하는 명령어는 CTRL을 같이 눌러도 똑같은 역활을 하는 경우가 많다. 
      ) CTRL-W j  CTRL-W CTRL-J와 같다.


      14. 마킹  마킹위치로 이동

      m[a-z0-9]

      파일내에서 마킹, 현재 버퍼내에서만 이동 함 예)ma

      m[A-Z]

      전체영역에서 마킹, 다른 파일로도 이동 함.

      `[A-Za-z0-9]

      마킹된 위치로 돌아감 예)`a

      ’[A-Za-z0-9]

      마킹된 행의 처으으로 이동함. )‘a

      직전에 커서가 위치하던 행의 처음

      ``

      직전의 커서 위치로 이동

      ’”

      이전에 vim으로 현재 파일을 닫았을 때 커서가 있던 행의 처음으로 이동

      `"

      이전에 vim으로 현재 파일을 닫았을 때 커서가 있던 위치로 이동


      출처:http://gyuha.tistory.com/157


      :%s/foo/bar/g


      vi의 기본적인 치환 방법을 실행하게 되면, 하나의 줄에서 가장 첫번째로 등장하는 단어만 치환한다.

      예를 들어 'foofoofoofoofoofoofoofoo' 라는 문장이 있다고 가정하자.

      :%s/foo/bar 를 실행하면 결과는 'barfoofoofoofoofoofoofoo' 와 같이 된다.


      만약 원하는 것이, 'barbarbarbarbarbarbarbar' 와 같이 모든 'foo'가 전부 'bar'로 바뀌는 것이었다면, 지금 소개하는 '전역 치환 방법'을 적용하면 된다.


      출처: https://techlog.gurucat.net/297 [하얀쿠아의 이것저것 만들기 Blog]

      MongoDB 2.2 버전부터 collection의 index에 TTL을 지정하여,

      시간이 경과하면 자동으로 삭제해주는 기능이 있음.


      일단 동작원리만 간단히 설명하자면 아래와 같다.

      1. TTL을 적용할 컬렉션에 expire time을 저장할 index를 만드는데, 옵션에 expireAfterSeconds 가 들어가야 함.

      2. 해당 컬렉션에 데이터를 넣을 때, 만들어둔 TTL용 index 필드에는 data/time object값이 들어가야 함.

      3. primary 머신에서 백그라운드로 TTL이 다 된 document를 삭제해주는 task가 돌면서 지워줌.


      아래의 단서조건이 붙는다.

      * TTL용 index 필드는 반드시 date BSON 타입의 데이터만 저장해야 함.

      * _id 필드를 이용할 수 없다.

      * 이미 index가 걸려있는 필드에 TTL constraints 부여 불가.

      * 복합인덱스는 안됨.

      * 만약 TTL용 필드가 배열이고 각 배열원소들이 date BSON 타입의 데이터가 저장되어 있다면 자동삭제 task는 해당 원소 중 가장 초기 date/time 값을 기준으로 삭제.

      * capped collection에는 사용할 수 없음.

      * 자동삭제 task는 60초에 한번씩 동작한다. 그러므로 60초 이하로 지정한 expire time은 정확한 삭제시간을 보장할 수 없다. (=오차범위 60초)


      [예제]

      // TTL을 적용하고자 하는 컬렉션에 TTL용 index 생성

      // 예제에선 logs DB의 mylog collection이라고 가정함.

      mongos> use logs

      mongos> db.mylog.ensureIndex({expire:1}, {expireAfterSeconds:3600}) // TTL = 1시간


      // expire값을 현재시각으로 넣은 이 데이터는 1시간 후에 자동으로 삭제됨

      mongos> db.mylog.insert({name:'mytest', expire: new Date()}) 


      출처: http://bloodguy.tistory.com/entry/MongoDB-document에-expire-time-적용하기-expire-TTL [Bloodguy]

      1. 질의 스크립트를 생성해주세요.
      query.js

      1
      2
      3
      4
      5
      6
      7
      var dbname = 'log';
      var db = db.getSiblingDB(dbname);
      var cursor = db.ItemLogData.find();
       
      while(cursor.hasNext()) {
       printjson(cursor.next());
      }

      query.js의 내용중에 dbname과 collection, 질의 내용을 본인에 맞게 수정해주세요.

      2 mongo 명령어를 사용해서 질의 스크립트를 실행해주시면 됩니다.
      $mongo –quiet query.js > result.txt

      + Recent posts